These instructions explain how to set up and make a small mosaic from glass mosaic tile. I use our new hardwood mosaic coaster bases with 12mm Elementile recycled glass mosaic tile as an example, and I show how to set up your studio work space in ways that control dust and sharp splinters of glass. I grew up working in a dirt-floor welding shop and have spent a lifetime thinking about ways to minimize my exposure to potentially harmful substances, especially dusts, so don’t let my emphasis on safety alarm you.
These instructions were also written for someone trying to fit the glass as close together as I did in my mosaic crab shown below. If you leave an irregular grout gap of 1/16″ or less, you will have to cut a lot less and create fewer shards and dust. (You will also be able to use nearly every piece you cut and be able to use regular sanded grout to grout it.)

Mosaic Studio Set Up
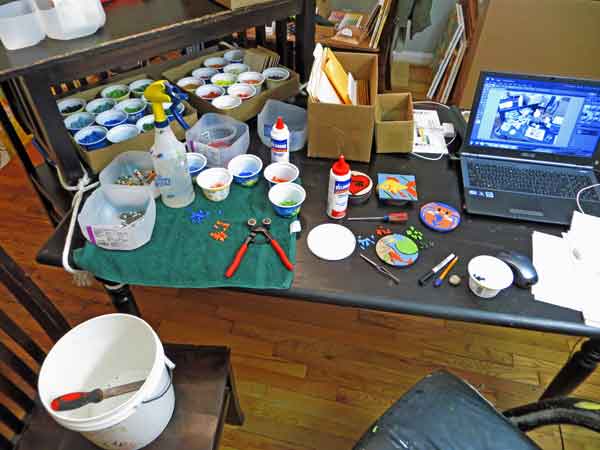
Your Vacuum Needs To Be A HEPA Vacuum
Your home vacuum should be HEPA quality, which means it removes at least 99.97% of airborne particles 0.3 micrometers (µm) in diameter. I say this for all uses including cleaning your house and not just for mosaics or other crafts. If your vacuum isn’t HEPA, then it is blowing out a lot of dust that you are breathing. Vacuuming should make the air more healthy to breath, not expose you to lots of dust. Keep in mind that the silicon dust you track in as soil can be just as bad for your lungs as most of the materials used in arts and crafts.
When you cut up glass mosaic tile, there will definitely be small vicious splinters of glass that hide unseen on surfaces until you slide your hand across it and get a nasty cut before you even know what bit you. A vacuum and a counter brush are good ways to remove these from the work surface and the surrounding floor and to pick up any dust that is created by cutting.
Cutting Towel and Spray Bottle
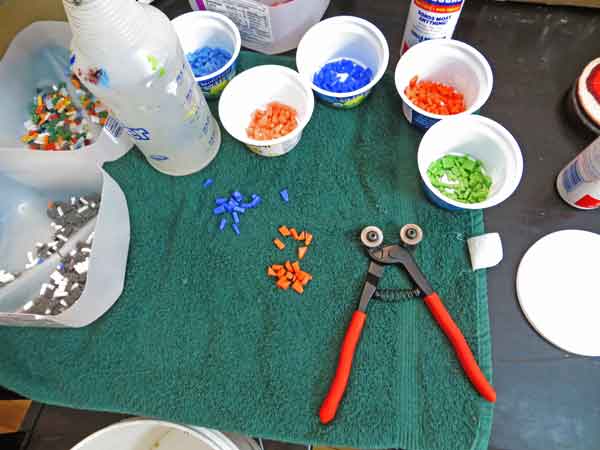
In addition to a vacuum, you should use an old dish towel or hand towel to contain any dust and splinters created by cutting tile. You can put the towel in a shallow box or dishpan to catch any pieces that fly off when nipped by the mosaic glass cutter. The towel and tile can be misted with a spray bottle to prevent the formation of airborne dust, but don’t be excessive. You still need to keep the moisture away from the vacuum to prevent the risk of electric shock, and moisture can cause wood backers to warp, especially thin wood such as the mosaic coaster bases.
Using Marble Files Without Creating Dust

Mostly you can get the pieces you need by nipping, but sometimes there are random slivers left at the edge of a cut, and the edges of the finished mosaic on a round coaster base usually requires smoothing. Now any blockhead can just grab the file and go at it, but I LIVE in my studio, so I use common sense practices such as wet sanding and wet filing to make sure I don’t create airborne dust. Use your marble file in a 2-gallon plastic bucket and mist with a spray bottle to contain the dust at the source.
Mounting Tile With Glue

We use the Weldbond brand of white PVA adhesive because it is the best PVA we have used and doesn’t get as brittle in cold temperatures as some of the other brands we have tried over the years. It also seems to be very water resistant when fully cured. (Note that water resistant does not mean water proof, and we use thinset mortar on all wet mosaics and outdoor mosaics.) The white disk in the photograph is a top from a plastic yogurt container. We use these to hold a small blob of glue and dip the bottom of the tile into the glue using a pair of tweezers.
If you are fitting the tile tightly together, make sure you start at the center of the mosaic and work outwards. Otherwise, you can warp thin wood backers by squeezing tile into tight places.
Drawing Mosaic Patterns On Your Backer
Draw the cartoon (outline) of your mosaic directly on the coaster base or whatever small mosaic backer you choose. You should start with pencil and then darken the principal lines with a fine-point marker such as a Sharpie. Your pattern should look like a picture from a coloring book: just the main lines and the outline of the figures.
You can also find a pattern on paper and transfer the pattern to the backer using graphite tracing paper (carbon paper). First, print the pattern as the same size as the backer by resizing the pattern using a photo-editing program. Then tape the pattern to the backer with carbon paper in between the pattern and the backer. Then trace over the pattern firmly with a ballpoint pen.
If you cannot print the pattern the same size as the backer, you can use these instructions for enlarging and transferring a mosaic pattern.
Grouting The Mosaic
Most mosaic art is made with a grout gap of roughly 1/32 inch to 1/16 inch and is grouted with sanded grout. If your mosaic is made with fitted tile such as mosaic crab coaster above, you should use nonsanded grout or leave the mosaic ungrouted. Note that leaving a mosaic ungrouted is not practical for wet mosaics and outdoor mosaics or even mosaic counter tops. Those mosaics need grout to seal out water.
You should mix your grout according to manufacturer instructions, which usually specify roughly 1/4 pound of water per every 1 pound of sanded grout, and mix it thoroughly to make sure all the powder is thoroughly wetted. The grout is applied by smearing the wet grout across the face of the mosaic, and you should make several passes from different directions to make sure the wet grout is being forced to the bottoms of the gaps and not just superficially covering the tops. A gloved hand is good for this work, but be aware that sharp edges of cut tile pieces can sometimes cut through a glove. That is why the grouting gloves we sell are thicker than most dish washing gloves. You can cut a plastic lid in half to make a great disposable grout spreader.
Make sure you don’t allow the grout to dry out as it as curing. Concrete hardens by BINDING water not by drying. If you have to, cover the mosaic in plastic wrap or use a humidifier. Both are recommended if you are in a dry climate or the heater or AC are running excessively.
Make sure you use a damp (but not dripping) sponge or rag to remove excess grout from the face of the mosaic, but be careful not to pull the grout out from the gaps between the tile. After grout has hardened, you can buff the face of the mosaic with wet and dry rags to remove any remaining haze.
Dispose of your wet grout in the trash and not sinks or drains. Grout is concrete and can harden underwater, and even the loose sand can be a problem is pipes.
Outdoor mosaics and architectural mosaics (such as counter tops and backsplashes) need to be sealed with a tile and grout sealer such as the TileLab brand from Home Depot, but small art mosaics don’t really require it unless you expect it to be subjected to splashes and stains.
Additional tips about grouting can be found on the mosaic grout page and our page for how to avoid grouting problems.
Sealing Sides and Backs Of Wooden Backers
I like to seal the side edges and backs of wooden backers with a clear polyurethane (sometimes with varnish, sometimes without) or with acrylic artists paint such as umber or burnt umber.
This keeps the plywood from delaminating and solid wood (such as the coaster bases) from cracking or warping. This is particularly important for coasters subject to spills and condensation from glasses.
Leave a Reply