Tag: backer board
-
Mosaic Mural Surface Preparation
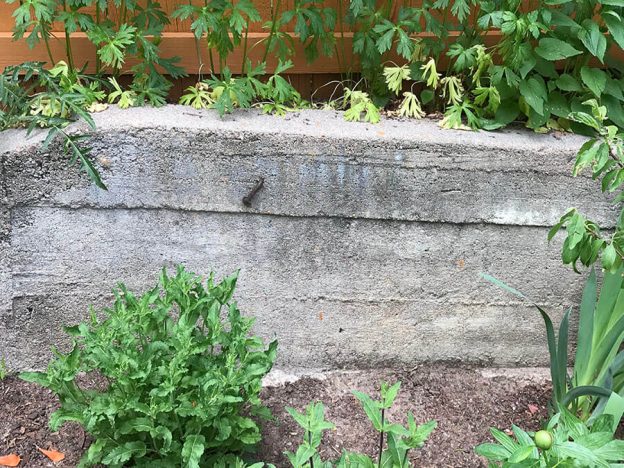
The best way to mount an outdoor mosaic mural is to use thinset mortar and mount it directly to a brick, stone, or concrete wall.
You can make mosaic murals on foam-core backer board and mount these backers onto wooden fences with screws, but that is less than ideal for several reasons, and the weight could cause the fence to lean if its posts aren’t securely anchored. That is why we recommend mounting mosaics directly on masonry surfaces (brick, stone, or concrete).
Masonry surfaces need to be cleaned and possibly smoothed before the mosaic is mounted, but that isn’t too difficult, and it is well worth doing if you want the mosaic to last any time at all.
-
Mosaic Letters and Numerals
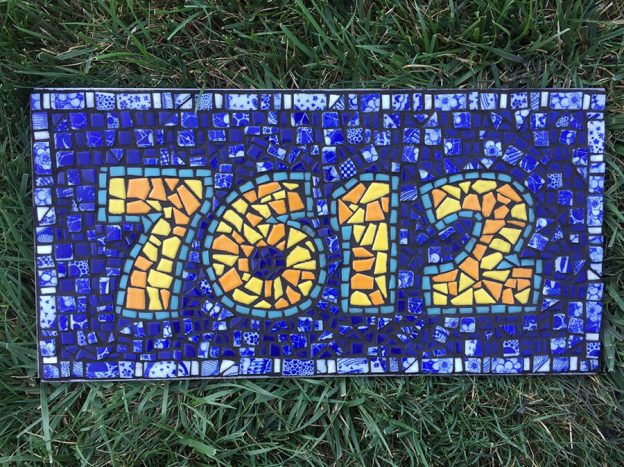
You can make mosaic street numbers and signs using a grid, but mosaics made from irregular shapes of non-gridded tesserae are more interesting, especially if you use concentric andamento for the background surrounding the figures.
Sara Sommers emailed us some pictures of her mosaic street number plaque, and it is made from cut pieces of tile in strongly contrasting colors. It is definitely worth checking out if you are thinking of making a piece with large mosaic letters or numerals.
Contrasting ColorsFor starters, Sara uses strong color contrast between her numerals and background, which is critical for making eye-catching art. She also uses multiple related colors and variegated patterns instead of solid monochromatic color fields.
-
Making Foam-Core Mosaic Backers For Outdoor Projects
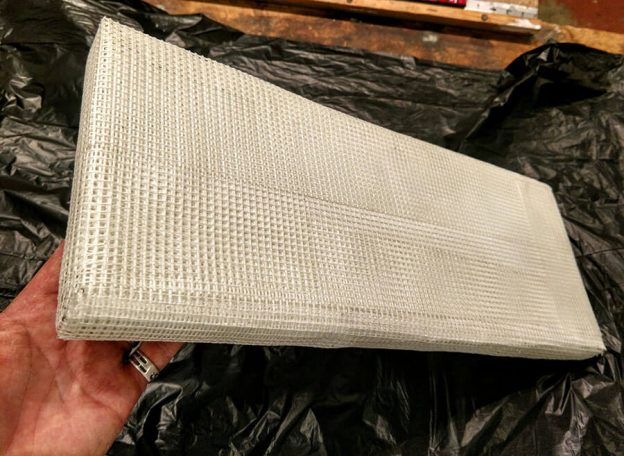
Artist Jill Gatwood uses the following method to make water-resistant foam-core mosaic backers for exterior mosaics, such as the Pet Memorial Name Plaques she does for clients who need something that is lighter weight and easier to ship than stone or solid concrete. The method wraps the foam in three or four successive layers of fiberglass mesh and thinset mortar, and that coating is pretty tough, tougher than stone. (The combination of polymer-modified cement and fiberglass can withstand blows that would easily crack granite of the same thickness.)
-
Materials and Methods for Outdoor Mosaic Tables
Artist Risa Puno recently completed her interactive mosaic sculpture Common Ground for Rufus King Park in Jamaica Queens, NYC, and the project is a great example for discussing materials and methods for mosaic table tops.
No Plywood Backers OutdoorsPlywood is never an acceptable backer for outdoor mosaic table tops.
Humidity in outdoor air can cause plywood to swell, contract, and warp, and even if the displacement is too small to be noticed, it can still cause grout to crack and tiles to pop off. Once grout has hairline cracks, moisture can penetrate underneath, and then there isn’t any hope for the mosaic lasting after that happens.
If you have a wooden table that you want to mosaic for outdoors, then attach a piece of 1/4-inch concrete backer board over the top of the wood and mosaic on that.
Seal your finished outdoor mosaic with a tile and grout sealer and reseal it each fall. Silicone-based gout sealers are wipe-on-wipe-off and easy to apply. Most of the work is buffing off the excess so that the surfaces are slippery.
-
Thinset On Plywood Mosaic Backer?
Thinset mortar can be used on a plywood mosaic backer provided the plywood has been sealed with a white PVA adhesive such as Weldbond. Otherwise, the plywood can suck the moisture out of the thinset before it has a chance to harden leaving it soft and crumbly. It is important to seal the plywood at least a day or two before you mount the mosaic with thinset because the Weldbond needs to be thoroughly dry and cured. For sealing purposes, Weldbond can be painted on with a brush or spread with a trowel. Many mosaic artists dilute the glue slightly or even up to 1:1 with water to make it easier to spread. Note that you shouldn’t seal your plywood with paint or sealers chosen at random because thinset will not bond to some of the oil-based and silicone-based products.
Some artists seal their plywood backers with Weldbond before mosaicing even if they are going to use that same Weldbond to mount the tiles. Why? They want to make sure that the entire surface of the plywood has been sealed so that it doesn’t suck the moisture out of the GROUT when it cures. I never worry about sealing the face of my plywood because I am sure that I will get enough Weldbond spread around when I mount my tile, and so pre-sealing seems like an unnecessary extra step to me.
Sealing VS SealingA note of clarification: In this article, I am talking about pre-sealing the face of the plywood with Weldbond or some other PVA adhesive. This is a different step from sealing the finished mosaic a few days after grouting with a tile and grout sealer or “sealing” the edges and back of the plywood with paint or varnish to prevent warping by moisture.
When You Should and Should NOT Use PlywoodPlywood can warp and delaminate over time merely from the humidity in the air, and so you should never use plywood as a backer for outdoor mosaic or a mosaic in a damp location. However, plywood makes a great backer for dry indoor mosaics and not just for its light weight, which in itself is a significant advantage over concrete backer board. Unlike concrete backer board, the edges of plywood can be stained or painted, and they do not shed crumbs of concrete and sand. In my opinion, concrete backer board should only be used inside walls and floors and other places where its crumbly edges are covered up; it is not a backer for moveable mosaic plaques.
Use Cabinet-Grade PlywoodNote that you should spend the extra money and buy cabinet-grade plywood (in 1/2 inch thickness) instead of the ordinary plywood used for sheathing in construction. The cabinet-grade stuff comes with a sanded finish and has no knots or internal voids. It is also more resistant to warping, and the edges of cut pieces are cleaner than those cut from regular plywood mainly due to the lack of voids in the internal plies. With all of these advantages, the cabinet-grade plywood is only about 15% to 25% more than regular plywood, and in real terms it is actually the same price: some of the regular plywood may need to be scrapped due to internal voids, and it will require more work to make the edges presentable. The edges of a cut piece of cabinet grade plywood can be left plain or painted. The edges of a cut piece of regular plywood will have voids and require putty, sanding and paint if not a frame to look presentable.
Why Use Thinset on Plywood?If plywood can only be used for dry indoor mosaics, then why would someone need to use thinset mortar on a piece of plywood anyway? The simple answer is there isn’t any reason to do so (IF you are using regular flat tile). With flat glass tile, you simply glue the tile on with Weldbond or some other PVA adhesive, let it dry for a day or so and then grout it by rubbing wet grout into the gaps and wiping away the excess.
However, some people (including myself) like to use rounded and irregularly-shaped found objects in our mosaics, and these are not easily grouted. Instead of the glue-then-grout method, we like to press our objects into a bed of mortar so that the excess mortar presses up slightly around the object and skip grouting entirely. It is also necessary to avoid grouting if your found objects are naturally porous (seashells, bones, unpolished stones) because grout will stain these materials.
The face of “Solstice Door” mosaic stele was made from a lifetime’s collection of found artifacts embedded in thinset mortar. Note that the stele is a reinforced concrete monument. Plywood would not support the weight of these materials. -
Outdoor Mosaic Signs
In the last section of one of my previous posts, Custom Shapes For Mosaic Backers, I showed some pictures and instructions for how I used 3/4-inch expanded steel to make a backer for an outdoor mosaic. The expanded metal was welded together in 3 plies, some mounting bolts were welded to this, and then the expanded metal was coated in thinset mortar fortified with very small pea gravel to form a solid surface. (Note that the assembly was cleaned with a wire brush to remove oils and dust before the thinset was applied.)
Built To Stop A TankI used this method of making a backer with built-in mounting bolts for two reasons: First, I could make the shape irregular and still have very strong edges without a metal border (which could have been welded on before applying the thinset if needed). Second, I wanted the backer itself to be incredibly strong because I wasn’t making a sign. I was making a backer for a found-object mosaic, and I didn’t want there to be any possibility of the backer flexing and cracking artifacts or not being durable. Third, I wanted the mounting bolts to be integrated with the backer itself and not secured by some separate frame which held the backer.
Some Lighter Weight OptionsOne negative consequence of making something this strong is the resulting weight. However, there are some options to bring down the weight considerably. The first option would be to use a lighter gauge of expanded metal, or maybe only using one ply instead of three plies and then wrapping that in hardware cloth before plastering with thinset. Another option would be to use the Wedi Board product or a concrete backer in a frame made from 3/4-inch angle iron and weld your mounting points to the frame. I don’t think I would use concrete backer board for this latter option because the edges tend to be crumbly. I would probably use light gauge expended metal coated with thinset even if I set this in an external frame.
Backer In An External FrameIf you do go the route of mounting a backer in an external steel frame, there are several things to consider:
First, remember to paint the frame with at least 3 coats of oil-based outdoor paint after all welding is done and cleaned, including all mounting studs and devices needed to lock the backer board into the frame (such as nuts welded onto the frame to accept a small bolt that keeps the backer from slipping out).
Why you need a locking device: You cannot rely exclusively on an adhesive means of keeping the backer in the frame because the backer could potentially delaminate over time. Depending on the size of your mosaic, you may need to use a heavy gauge of angle iron or nest two pieces for each element of the frame.
Estimate the weight of your finished mosaic and make sure the frame can support it. Make sure the the corners are double welded and make use of corner braces to help ensure that the bottom of the frame doesn’t pop off if the frame rusted badly over the years.
For added effect, make the frame part of the art and not an afterthought or just a default to a conventional rectangular frame. Consider a frame that grasps a reinforced backer at several key points instead of a more conventional frame that wraps all exposed edges. Of course, that requires a thicker backer, or at least a backer with a hollowed-out back and thicker outer edges.
Mounting Bolts Welded Directly To Backer SkeletonIf you decide to use my approach of creating an expanded steel skeleton covered in thinset mortar with mounting bolts sticking directly out of the concrete, then you need to weld the different plies of expanded steel so that they provide a good place for the head of the bolt to be attached to the central ply of steel.
A nut is used to hold the bolt onto the expanded steel. The nut and bolt head are welded in place. Note that there are several places in this picture where the different plies of expanded steel need to be welded together.Make sure you use a carpenter’s triangle to make sure your mounting studs are vertical. Sometimes you have to tack weld the bolts in place and then bend the weld slightly to get them straight.
Another concern is the potential for the mounting studs to rust over time. The water running off concrete tends to be slightly alkali and corrosive to steel. I would spray paint the back side of the backer, especially around the mounting studs. You should also consider using larger gauge bolts for your mounting studs.
Mounting stud from the reverse of the backer. Another coat of thinset mortar should be applied to fill the voids and ensure that all of the expanded steel is covered.Before I began mounting the mosaic tile to the backer, I would make sure that the edges of my backer were finished properly and apply extra thinset to cover any bare expanded steel sticking out so that there aren’t any safety or corrosion issues over time. Of course, this is easiest if you did a proper job of welding and cleaning the edges of the expanded metal so that there aren’t any sharp points to begin with. Make the edges of the metal skeleton as robust as possible with thick globular welds and clean these thoroughly.
Mounting Mosaic SignsThere are some comments at the end of my post about Custom Shapes For Mosaic Backers, that discuss the issues involved in mounting a mosaic sign to a masonry wall.
-
How To Select A Jigsaw For Making Mosaic Backers
Tools Are Cheaper Than Craft Supplies
I have often made the claim that a person could buy a sheet of cabinet-grade plywood and a jigsaw for less than what the craft suppliers charge for shaped mosaic backers such as hearts and stars and things like that. While this might be an exaggeration for an individual backer, it is perfectly true if you need to get backers for a class of 20 people. In my post about making custom-shaped mosaic backers , I also explained why it is better to cut your own shapes if you are trying to make original art because you can make each shape slightly different and unique.
Jigsaws are fairly common, so you might be able to borrow one, but here are some guidelines if you decide to buy your own. Note that jigsaws are best at cutting curves. If you need to cut straight precise lines, then you need to use a circular saw or a table saw, but keep in mind that those two types of saws are more dangerous than a jigsaw.
This post is not a review of models currently on the market. Instead, it is discussion of general principles that should help the reader make a more informed purchase for any type of power tool or electronic device.
Never Buy The Cheapest ModelNever buy the cheapest model. In the past, there was a problem with things not lasting very long, but the trend of making things cheaper and cheaper has progressed to the point that it is now possible to buy tools and electronics that don’t work or barely work even from the beginning. Most people can walk into a dollar store and recognize the type of products I am talking about. What you might not be fully aware of is that this problem with non-functioning and barely-functioning products has spread to more mainstream retailers such electronics chains and home improvement chains
Manufacturers know that many buyers are completely uninformed and buy a new product solely on the basis of lowest price. Consequently, they all are “forced” by economic pressures to produce at least one model geared toward the bottom of the market.
Never Buy The Lowest AmperageThe power rating of jigsaw is expressed in terms of the amps of electrical current that it consumes at full speed. Due to the economic pressures expressed above, manufacturers now produce power tools that no informed buyer would ever purchase simply because they aren’t powerful enough for most jobs. These low-amperage tools just don’t have the power to be useful or last very long.
Don’t Buy A Rechargeable ToolRechargeable batteries only last if they are depleted fully and recharged fully. Occasional light use and continual charging is bad for the battery and destroys the battery’s ability to hold a charge.
Unless you work as a carpenter and use your tools daily, get a jigsaw with a power cord. The environmental cost of all these rechargeable batteries is simply too high, especially when they are used in ways that more or less guarantee that their life is short.
Don’t Buy Features Over QualityEveryone is familiar with a certain computer operating system that owes its success to having a lion’s share of the market and to the monopolistic practices of the company that sells it. Each new version of this operating system offers ever more bells and whistles, while the software itself still suffers from the same basic problems with stability and useability that have plagued it for years. The economic reasons for this situation are simple: New features make the product outsell the competition, even when the “competition” is merely the older version of the product that the consumer might reluctantly continue to use.
To a certain extent, features can become a trap where it is possible to buy the most cheaply made product even when you thought you knew better than that. For example: You may have been smart enough to avoid buying the absolutely cheapest model, but did you buy the cheapest model with the laser guide or some other feature? The question becomes this: How cheaply did they have to make the jigsaw itself in order to include a laser guide and still be the cheapest model with that feature?
Read NEGATIVE ReviewsAlways read online reviews, even if you plan to buy locally. Amazon.com is frequently a good source of information for common products, but keep in mind that even a poorly designed product will get some positive reviews. I think this is because some people are just glad to open the box and tell people about the new toy they just got. Often these mindlessly positive reviews will more or less admit as much: “I just received my new JuiceTronic 9000 Smoothy Machine, and I am so excited…”
The key to making use of reviews is to read the negative reviews and find out how long the product tends to last, what design defects it might have, etc. You want to know what the man thinks after he has divorced the princess, not what he thinks on the day he married her.
All that being said, you have to take negative reviews in context. Even the best product in the world is likely to have some negative reviews. Remember that some problems are due to abuse or user error or the odd lemon, and some people are just mean-spirited trolls that are angry at the world.
At one point on Amazon, there was this guy who gave negative reviews for the Sharpie markers because these markers (which are clearly labelled as permanent markers and famous for being so permanent) wouldn’t erase off his dry erase boards. Some people are just ignorant and proud of it.
-
How To Make Custom Shapes For Mosaic Backers
Rectangular backers are fine for most mosaic designs, but sometimes you want to make an irregularly-shaped mosaic or a mosaic with a custom shape, such as the silhouette of a common object: tree, automobile, flower, turtle, etc. How you make such a backer and what materials you use depends on whether or not the mosaic will be installed in an outdoor or wet location. Note that not every location in a kitchen or bathroom has to be considered as being “wet.”
First, I will discuss irregularly-shaped backers, and then I will explain how to make custom-shaped backers for both indoors and outdoors. The last section about custom-shaped backers for outdoors should be useful for people making mosaic signs and placards.
Why You Should Not Buy A Shaped BackerIf you buy a shaped backer from a craft supplier, then your mosaic will have exactly the same shape and size as all the other mosaics made from that particular backer. Also, most of that craft crapola is designed in China, and it all looks rather dated. The saddest customer picture we ever received was a picture of a beautiful mosaic design (serious, intense, original) executed on the most boring, cutesy, cliche shape of a ladybug. Oh what might have been…
Irregularly-Shaped BackersIf you want more of a random “found” shape instead of a specific shape, then the solution is to use a piece of scrap plywood or flagstone depending on whether or not the mosaic is outdoors.
IndoorsFor indoor mosaics, you can use a piece of 1/2″ cabinet-grade plywood, and a local carpenter or cabinet maker can give you more than you could ever use. Check with friends and their spouses for a few pieces of scrap, or you can buy a sheet of cabinet-grade plywood at a building material store such as Home Depot or Lowes and have a friend cut out what you need with a jigsaw. You can also buy a decent jigsaw for about $75, but make sure you follow the safety instructions and maybe watch a safety video or two on Youtube if you are a novice with power tools.
OutdoorsFor outdoor mosaics, you should not use wood or adhesive. Wood doesn’t even have to get wet for the humidity in the air to swell and warp it. Instead of the glue-then-grout method used for indoor mosaics, you should use thinset mortar to attach the tiles to a stone or masonry surface. Concrete backer board can be used for rectangular and circular mosaics that have some sort of frame (such as the rim of a metal patio table), but the edges of concrete backer board can be crumbly, and that makes it a lot less useful for irregularly-shaped mosaics where the edges are left unfinished, such as you see in the fragments of ancient Roman mosaics displayed in museums.
To make an irregularly-shaped outdoor mosaic in the style of a Roman or Greek fragment, use a piece of flat flagstone such as can be found at stone stores, landscaping stores and some higher-end lawn and garden centers. Avoid slate and sandstone, especially the softer varieties. You can get a general idea of how soft or brittle a type of stone is merely by paying attention to how it has been breaking or scratching or weathering in the big piles or stacks at the stone store. Slate is good and flat and smooth, but it tends to be thin and break too easily for most sane people to care about mosaicing on it.
Custom-Shaped Backers For Indoor MosaicsFor indoor mosaics, 1/2-inch cabinet-grade plywood is my preferred backer, and it is sold at most building material stores. It comes pre-sanded and is more resistant to warping than the cheaper plywood used for construction sheathing. There also fewer if any internal voids in the plies of wood, so the edges are stronger and look neater. The few extra dollars for cabinet-grade plywood are worth the cost.
The shape of your backer can be drawn directly on the plywood with a pencil, or you can first draw the shape on cardboard or paper and then cut it out and use it as a stencil and trace the shape on the plywood.
Cutting the shape out is best done with a jigsaw, which can be bought for about $75, but you can ask friends and their spouses to do it for you if they have one. Most people who work with carpentry or cabinetry will have one, but if you decide to cut it yourself, make sure you watch an online safety video about using jigsaws first. In my opinion, jigsaws aren’t nearly as dangerous as circular saws and table saws, but novices should be extra careful when using power tools.
Custom-Shaped Backers For Outdoor MosaicsMetal isn’t recommended as a mosaic backer, but if you are mounting the mosaic outside, then metal will probably be involved in some way, at least in how the mosaic is attached to the building or post. The most obvious solution is to have concrete backer board set in a metal frame made from angle iron, and this frame can have mounting studs (bolts) welded to it prior to painting it and inserting the backer board.
I don’t recommend hanging mosaic signs from chains because mosaic work is heavy, and intense wind from storms can turn the sign into a battering ram. Also, the chains would need to be checked periodically for wear, and the artist cannot guarantee that the owner of the sign will do this over time.
Of course, a frame made from angle iron is really only practical for rectangular shapes.
My approach for making a custom-shaped mosaic for outdoors was to put the steel inside the concrete. Essentially, all I did was cut out my shape in 3/4″ expanded steel using a cardboard pattern as template, then weld mounting studs (bolts) to it, and then I encased it in thinset mortar, which is a type of sticky concrete.
Expanded steel 3/4 inch. The 3/4 inch measurement refers to the size of the internal holes, specifically the minor axis (shorter dimension) instead of the longer side-to-side dimension.The 3/4″ expanded steel was cut using an angle grinder with a thin cutting wheel because I didn’t have a cutting torch and haven’t yet saved up enough money to buy a plasma cutter. (Are you listening Santa?)
I used my cardboard template to outline two pieces of expanded steel, and I made sure that the direction of the expanded metal was oriented at 90 degrees between the two pieces. That way when I welded them together, I was sure that the holes would not line up perfectly. Instead, I wanted the holes in each piece of metal to be partially covered by the other sheet.
This structure was made from scraps of expanded metal I had in the shop instead of two pieces expressly cut out for the job, but notice how I made sure the expanded pattern in the top and bottom layer are still rotated 60 degrees from each other instead of perfectly lined up. A rotation of 90 degrees is optimal for ensuring the holes in the resulting structure aren’t too large.Once I had my shape welded together, I welded some 3/8-inch bolts to it to that the finished mosaic could be bolted to a wall. Then the frame was scoured with the stiff wire brushes that are used to clean welds.
The thinset mortar I used to cover the frame was applied in multiple coats. The first coat was mixed with about 50% fine pea gravel so that the mortar had some bulk to fill the holes in the frame. Note that most pea gravel you see at lawn and garden centers will need to be sieved through 1/4″ hardware cloth or at least have the larger stones picked out. If that seems tedious, then consider how tedious it will be to pick put the large stones once they are coated in sticky concrete but are too big to be pressed into the frame. (Been there.)
This is the underside of a finished outdoor mosaic backer. Note the three mounting studs. Also note that the top surface (facing down) is a lot smoother than this backside. I made the top surface perfectly smooth by applying a second coating of thinset to the top face and then setting it upside down on a piece of construction plastic.Thinset mortar contracts or “thins” as it cures, so there isn’t much point in making your surface perfectly smooth with the first application. Of course you want it level, and you don’t want any large pieces sticking up, but there is no need to try to smooth it to a finished surface with a trowel. If you do smooth it perfectly, you will notice dimples that get larger each day for about a week as the thinset contracts internally.
Due to this internal contraction and the resulting dimples, I wait about a week before applying this second coat, which mainly involves spreading the thinset on the face with a putty knife or trowel and then turning the mosaic face down on a piece of construction plastic.
Roll of construction plastic. Grout does not stick to plastics in general, but this stuff is especially good about being stick free.Construction plastic is sold in large rolls at building material stores. A cheaper alternative is clingy kitchen wrap such as the Saran Wrap brand. Kitchen wraps aren’t as strong, and they don’t tend to stay put even when taped down, but an easy solution to this problem is to find a large piece of cardboard and wrap it around the cardboard about 3+ layers deep. Then you can lay the covered cardboard on your work surface.
WARNING AND DISCLAIMERUse this improvised method and these instructions at your own risk. Like all the instructions on my websites, these instructions haven’t been rigorously tested in corporate laboratories. Neither can they anticipate all the potential mistakes an individual could make in executing them. As always, if you are installing anything for a client, it is your obligation to evaluate the strength, safety and longevity of your art, especially if it is to be displayed in a public space.
All that being said, there isn’t too much if anything in these methods that uses materials in a way that they aren’t commonly used or at least in a similar way. Unless you weld things in an amateurish way or fail to clean the welds, then the backer should have a very long life, even outdoors. The only mode of failure I am particularly concerned about is the possibility of the bolts rusting through over time, although that would be a concern with any heavy sign mounted by bolts.
-
How To Cut Cement Board
Two Types Of Cement Board
There are two types of cement board: The first type contains wood fibers or wood particles mixed in with the cement. The second type is portland cement between two sheets of fiberglass mesh. The second type is completely water resistant, and that is what we use in our mosaics when we use cement board.
Two Methods of Cutting Cement BoardThere are two methods for cutting cement board: score-then-snap and jigsaw. The score-then-snap is faster and creates less dust, but it can only be used for straight line cuts.
Score-Then-SnapThe Score-Then-Snap method uses a box cutter to score the board, with the purpose of the score being to cut the strands of fiberglass mesh on that side of the board. A pencil and straight edge (yardstick or carpenter’s square) is used to measure and mark the board before cutting. Cut slowly and firmly to avoid deviating from the line, which happens all too easily due to the surface roughness and the blade snagging on the mesh. Tip: Cement board dulls blades very quickly, so use an old blade and not a fresh sharp one.
A box cutter is used to score the cement board and cut the fiberglass mesh just under the surface.Make a second pass in your score to make sure all strands of the fiberglass mesh have been cut. Once that is done, the cement board can be snapped with minimal force using the edge of your work surface. You can also slide a yardstick under the board and line one edge of the yardstick up with the score. Pressing down on both sides should snap the board.
The edge of a worktable or landing makes a natural place to snap the cement board once it has been scored but sometimes all that is required is to slip a yardstick underneath the score and press down on both sides.The third step is to flip the board over and cut the fiberglass mesh on the back side using the box cutter.
JigsawJigsaws can be used to make curved cuts in cement board, but the process does create silica dust, so wear a dust mask.
Jigsaws should be run at slow speed to minimize the amount of dust generated.Run the jigsaw at slow speed to minimize the amount of dust you create. Also make sure the cement board is supported and not allowed to flap up and down during the cut. It is possible to damage the board and weaken it by flexing and cracking the concrete.
Of course, the blade in the jigsaw should be a carbide grit blade, which is different from the toothed blades used to cut wood and metal. However, if you are like me, you save and “downcycle” everything, and you can use old wood blades that have become too dull and worn out to cut wood cleanly. The coarser the teeth the better. Run the jigsaw at slow speed and be prepared to change out blades when the teeth get worn off, which happens quickly.
The carbide-grit jigsaw blade is still in the packaging because it will be returned to the store after the photo shoot. We save our old wood blades when they get too dull and worn out to cut wood and use them on the cement board. How To Cut Holes For SinksSometimes you need to cut holes in cement board, which is commonly done for sinks in countertops. You can use a jigsaw for that, but the problem is how to get the blade started. The solution is to drill a hole in the cement board using a masonry bit. Here are a couple of tips for doing this without damaging the board:
Tip 1. Drill Pilot Hole In Wasted MaterialDrill the pilot hole in some of the wasted board to be cut out not right on the line of the cut because you are likely to mess up the smoothness of the sink hole if you try to drill your starter hole there.
Tip 2. Support The Board While DrillingMake sure the board is supported completely underneath when you drill it and not sticking out over the edge of your work surface. The pressure of drilling is enough to flex and bend the board, which cracks the cement.
When To Use Cement Board As A Mosaic BackerIndoor mosaic plaques and table tops can be made on plywood, but architectural mosaics such as floors and backsplashes and countertops should be made on cement backer board. The reason is simple: plywood can compress, sag and flex over time, especially when the plywood is part of a house with all that implies about exposure to humidity, water and structural stresses over time.
Most of the building material stores I have used (mostly Home Depot in Georgia) carry the fiberglass mesh variety of cement backer board in two thicknesses: 1/4 inch and 1/2 inch. They say you can use 1/4 inch in flooring because the concrete backer board doesn’t supply any structural strength to the floor, but I’ve noticed that the edges of 1/4 inch board tends to get damaged more easily during handling and construction, especially if the tile doesn’t get laid right away. That being said, you might need to use 1/4 inch on your floor merely to save weight.
An Important Note About WeightWhen installing tile floors, make sure you have a carpenter look at the joists under the floor to make sure it can hold the weight of the backer and the mosaic tile.
-
How To Mosaic a Patio Table
Replace Glass Top With Concrete Board
Glass-top metal patio tables can be used to make a mosaic table by replacing the glass top with 1/4 inch concrete backer board. The concrete backer board is roughly the same thickness as the glass top it is replacing, and it can rest on the rim of the metal table just as the glass top did. However, the thin concrete backer board can sag if unsupported, so marine plywood or pressure-treated plywood should be laminated to the underside of the backer board to stiffen it.
Note that the plywood should be slightly smaller in diameter than the concrete backer board so that it doesn’t interfere with the metal rim of of the table. Only the concrete backer board rests in the inside of the rim where the glass rested. If the plywood were to rest there, then the table top would be too thick and stick up above the rim instead of fitting inside it like the glass.
Steps For Replacing The Glass Top With Reinforced Concrete Mosaic Backer buy 1/4″ concrete backer board from building material store. measure glass top being replaced. cut 1/4″ concrete backer board into a circle the same size using jig saw. cut pressure-treated plywood into slightly smaller circle using jig saw with fresh blade. glue plywood to concrete backer board using Weldbond or other PVA glue. paint underside of plywood and its outer edge with multiple coats of outdoor paint. insert table top into metal table base. Repairing Edges of Concrete Backer BoardConcrete backer board sometimes has bubbles and voids that aren’t exposed until you cut across them and leave a weak spot or rough crumbly spot at the edge of the piece. You can also damage the edges of the concrete backer board during transport and handling. If this happens, you can repair and reinforce these weak crumbly places with the same thinset mortar that you use to attach the tiles.
Use Thinset Mortar Instead of GlueOutdoor and wet mosaic should always be done with thinset mortar instead of glue. Thinset mortar is concrete with polymers added for strength and adhesive properties. You can also use the thinset for grouting the finished mosaic. An outdoor mosaic made with thinset will last many times longer than a mosaic made with glue, and that is why they use thinset for attaching tiles in swimming pools.
Using ThinsetWe use Versabond brand thinset by Custom Building Products and add 1/4 pound of water per pound of thinset. Thinset comes in big bags that are inconvenient. We keep the bag of thinset in a 5-gallon plastic bucket with a lid. We slide the whole bag into the bucket and cut the top off the bag and scoop out what we need. Never try to pour it unless you like big clouds of dust that is dangerous to breath.
Finding The Right Table Is Easier Than Making The Wrong Table WorkI have always disliked the subject of mosaic tops for metal patio tables because I receive too many emails from lunatics who think the most important thing about the table to be mosaiced is that it is what they already happen to have on hand. It doesn’t matter to them if the table is broken or rusting to pieces or made of wood or already has an expanded metal mesh top welded in place.
For these people, it isn’t about finding a table that is appropriate for a mosaic top, it’s about making whatever they happen to have work, no matter how flawed or problematic or downright dangerous it might be. What’s worse is that when I take valuable time to email back explaining why the table is a poor candidate, they usually email back proposing some farcical method of making it work and wanting further comment.
These proposals show a lack of understanding of basic concepts, but what really makes them insufferable is that they are usually posed as questions asking me to explain why it would not work or why it wouldn’t make the process quicker or easier, usually in a pleading way. (As if my agreeing with them could somehow alter laws of physics or other aspects of objective reality… )
Reading their emails always brings to mind an expression used in the military, one that is blunt, crude and profoundly apt, like so many military expressions: You cannot polish a turd. How many times have I longed to type those words into an email reply!
Inspect Table For Strength And StabilityA mosaic table top can weigh significantly more than the glass top it is replacing. Before doing anything else, inspect the table to make sure it can hold the weight. Look for broken welds in particular, but also keep an eye out for the gauge of materials used for the table. Most metal patio tables are much heavier and stronger than they need to be, but factories make things lighter, cheaper and more disposable each year. If the table in question appears to be light-gauge and weaker than most wrought iron you have seen, then think twice before using it as the base for a mosaic table top.
Bistro TablesIf you use a small metal bistro table, then make sure that you don’t create a safety problem by putting a very heavy top on a table that is taller than it is wide. This can make the table unstable and easy to tip over. The heavy table top could easily injure someone if the table were knocked over by a casual bump. The solution is to anchor or weight the feet of the table, and a sock filled with sand and tied in a knot is often all that is required. Using wire to twist tie the table to the railing of a balcony is another quick solution.
Glass Mosaic Tile Is Best For OutdoorsGlass in nonporous and therefore impervious to moisture and freeze damage. Ceramic tile and stone are porous, and thus water can penetrate inside and freeze and crack the tile over time, sometimes very rapidly depending on where you live. Sure we have a lot of Roman stone mosaics from 2000 years ago, but those mosaics are in the dry warm Mediterranean basin and not west Michigan…
Remember To Seal Outdoor MosaicsA few days after grouting, you should seal your mosaic with a tile and grout sealer. Tile and grout sealers are invisible pore sealers and not coatings that form a separate layer over the top of the mosaic. You wipe them on with a rag, and then wipe away the excess with a clean rag and allow to dry for ten minutes. Apply it 3 times or whatever the manufacturer instructions recommend.