Tag: safety warning
-
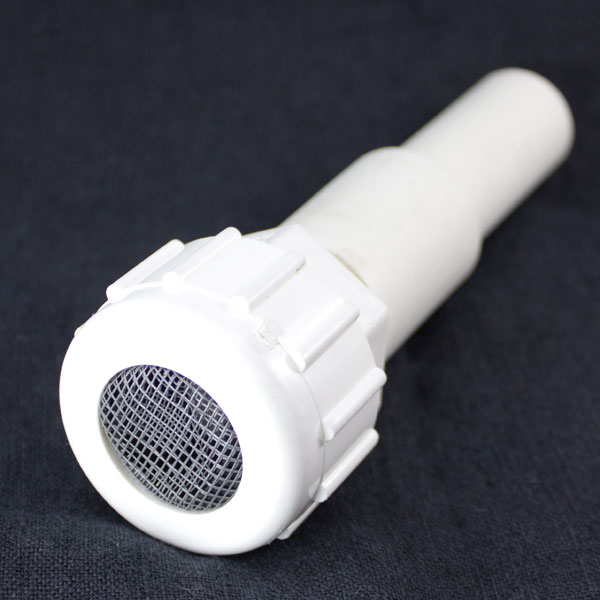
Vacuum Attachment For Removing Dust From Small Parts
The new SPARDUSTER™ Small Parts Dust Remover looks like a simple vacuum attachment, but it is actually nothing less than a revolution in studio and workshop cleanup. With this simple tool, cleaning up a work surface covered in mosaic tile goes from 45 minutes of tedious sorting to a few minutes of casual effort. You can…
-
Cutting Pan For Mosaic Tile
Cutting glass tile with a mosaic glass cutter is a relatively quiet and gentle process because not much force is required to make the cut. However, glass is a brittle material, and cutting it with a compression tool causes pieces to snap off and bounce across the room. In addition to usable pieces of tile, tiny slivers of…
-
Small Glass Mosaic Instructions
These instructions explain how to set up and make a small mosaic from glass mosaic tile. I use our new hardwood mosaic coaster bases with 12mm Elementile recycled glass mosaic tile as an example, and I show how to set up your studio work space in ways that control dust and sharp splinters of glass.…
-
Penny Mosaic Warning
We regularly see questionable information online concerning how to mosaic and how to do other art and craft projects. Mostly this information is questionable because it was written without regard to durability or how the project could have been used as an opportunity to make real art (personal, unique) instead of making clones of something…
-
How To Cut Marble Small
Recently a customer emailed me asking how to cut a piece of marble mosaic tile into very small pieces. He reported that he could easily cut the marble tile into thirds by making straight cuts, but when he attempted smaller pieces or diagonal cuts, the marble would crumble or break into jagged pieces The customer verified…
-
Assessing Glass Mosaic Tile Health and Safety Concerns
Recently a customer emailed me asking if there was an ASTM-D4236 certification for one of our glass mosaic tile lines. ASTM-D4236 is the labeling and precautionary standards for chronic health hazards in art materials. There isn’t an ASTM-D4236 certification for any of our products to my knowledge. They are manufactured as building materials and not…
-
Architectural Mosaic Safety Issues
An architectural mosaic can cut someone if sharp edges are left exposed or crush someone if it’s not mounted securely. Even a small mosaic plaque is significantly heavier than a painting or photograph of the same size and should not be hung with light gauge wire or fasteners. Preventing Cuts Would You Glue Razor Blades…
-
How To Store And Reuse Dust Masks
Mixing up grout and thinset require that mosaic artists wear dust masks on an occasional basis. I wear an N95 particulate mask, which is the same one I wear for sawing wood with power tools and many other shop and studio tasks that involve non-oily dust. An N-95 captures 95% of the particles of a…