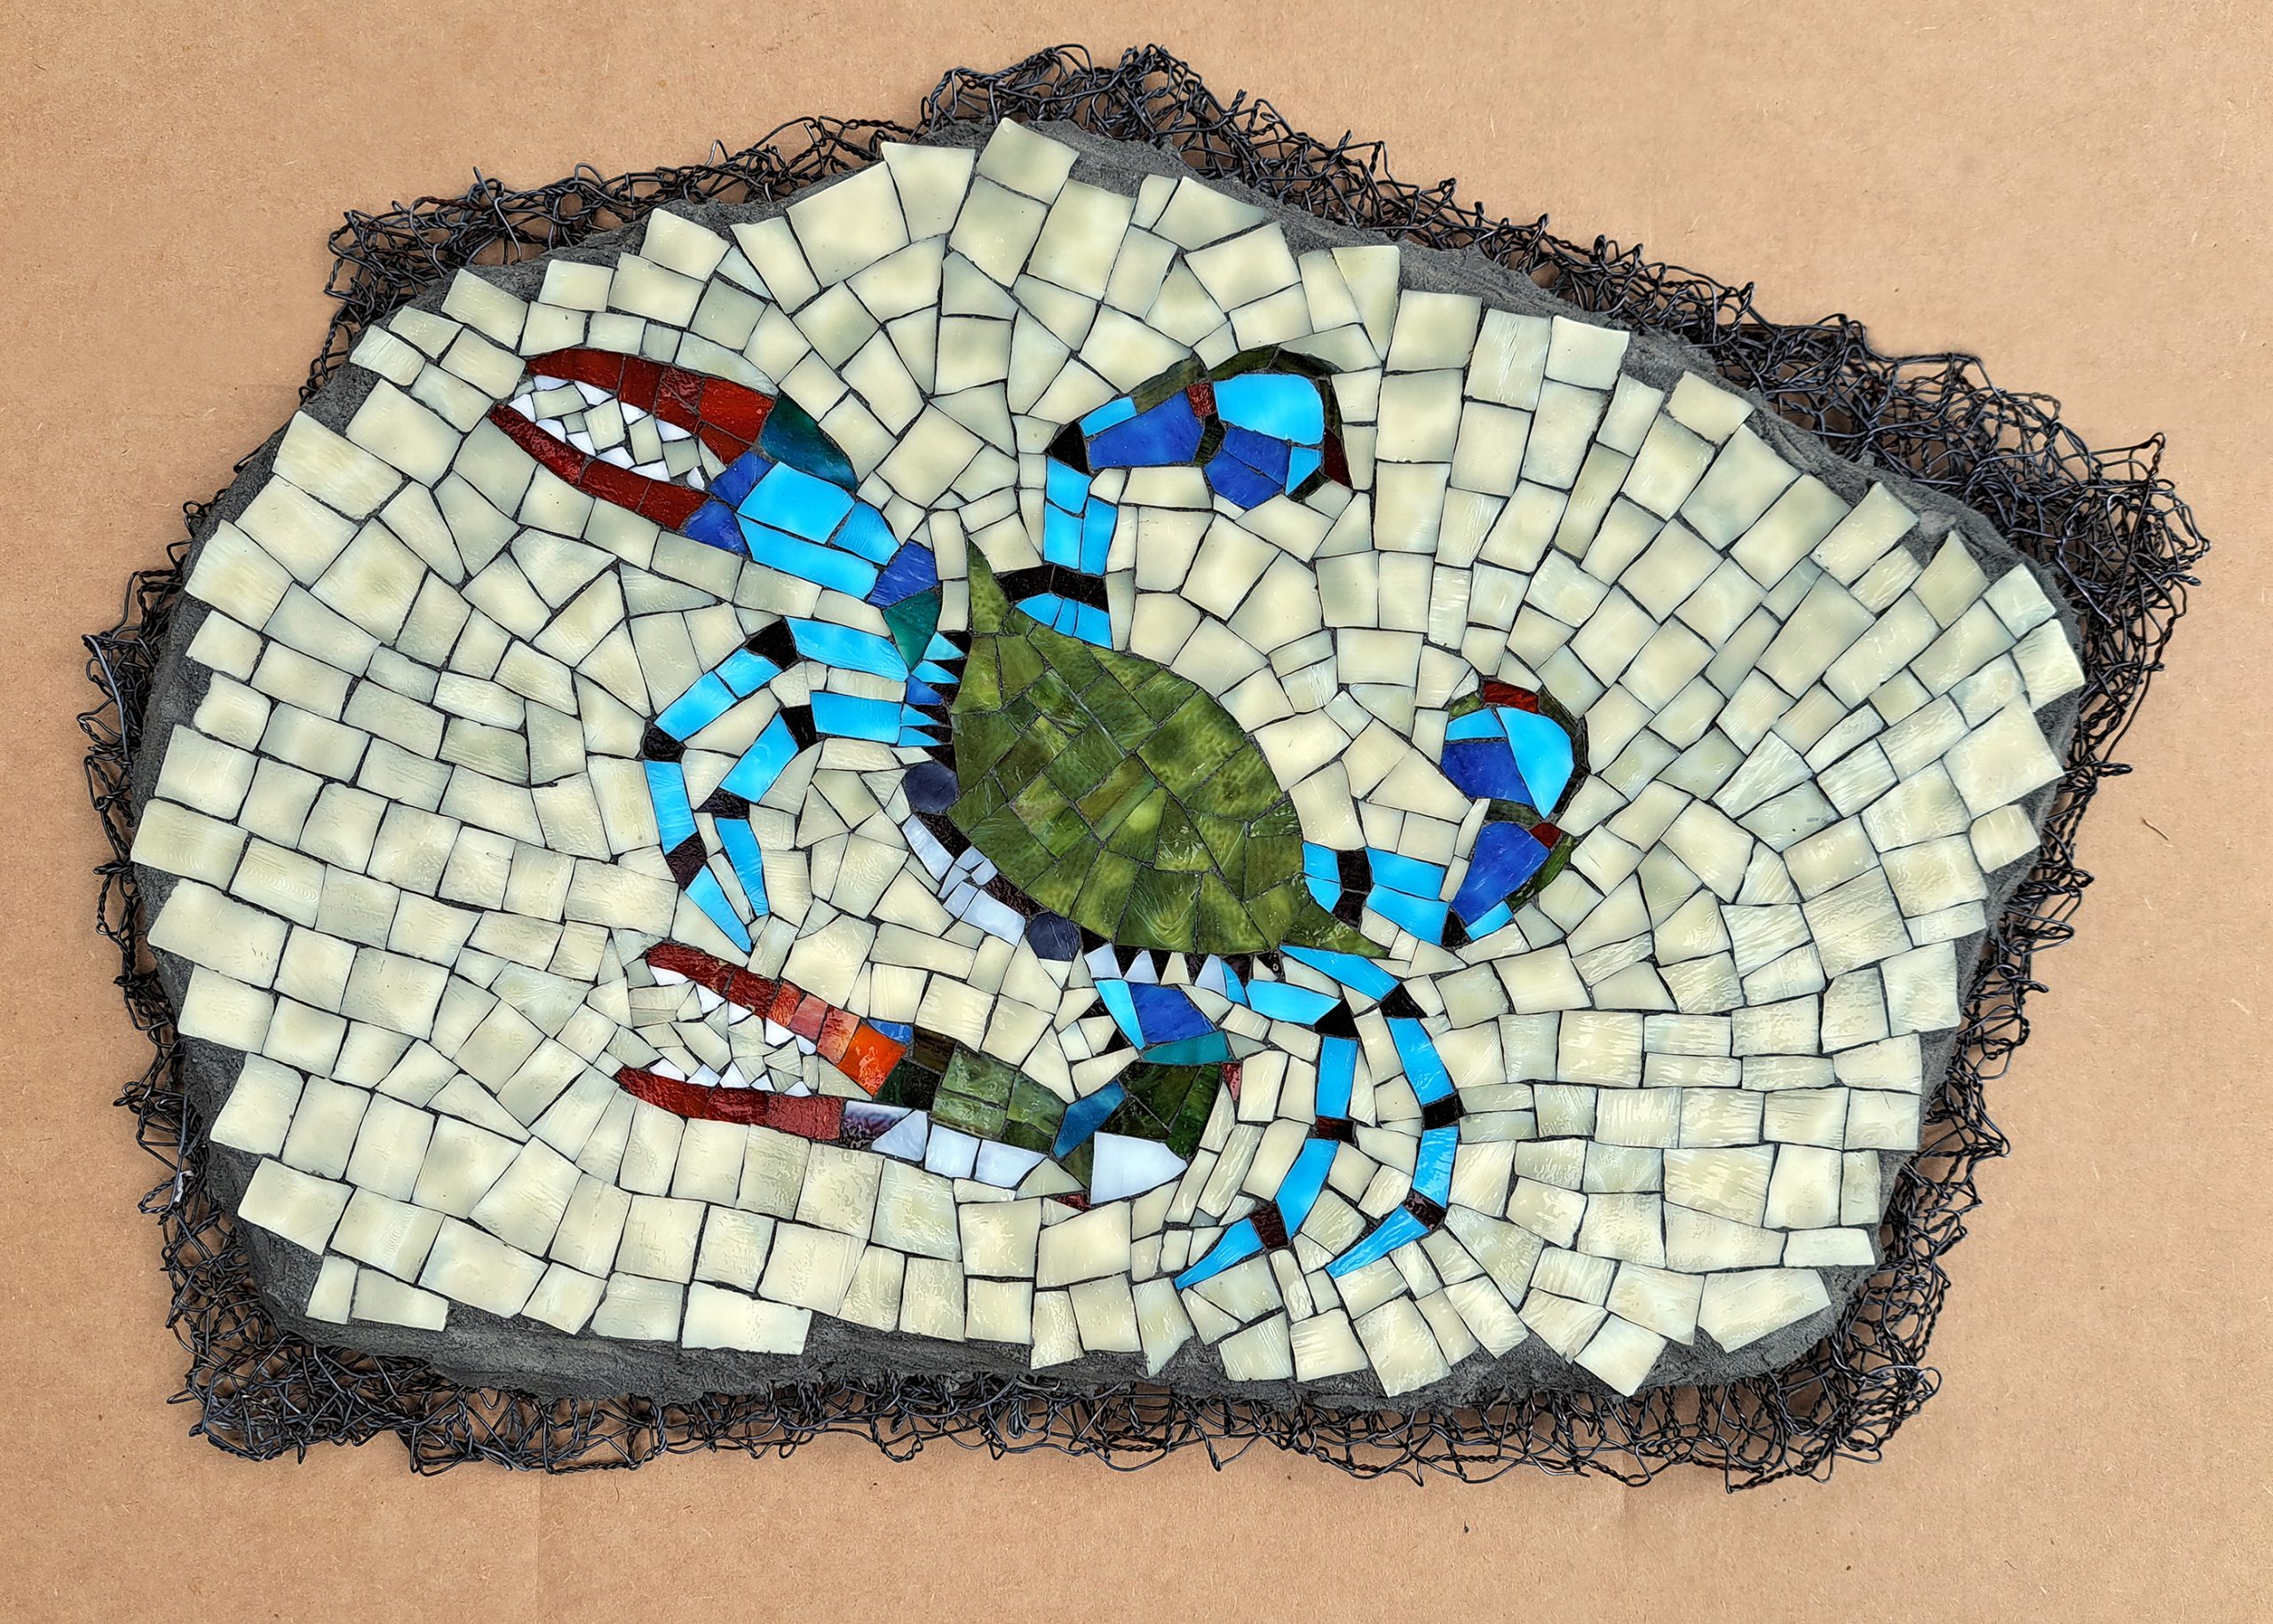
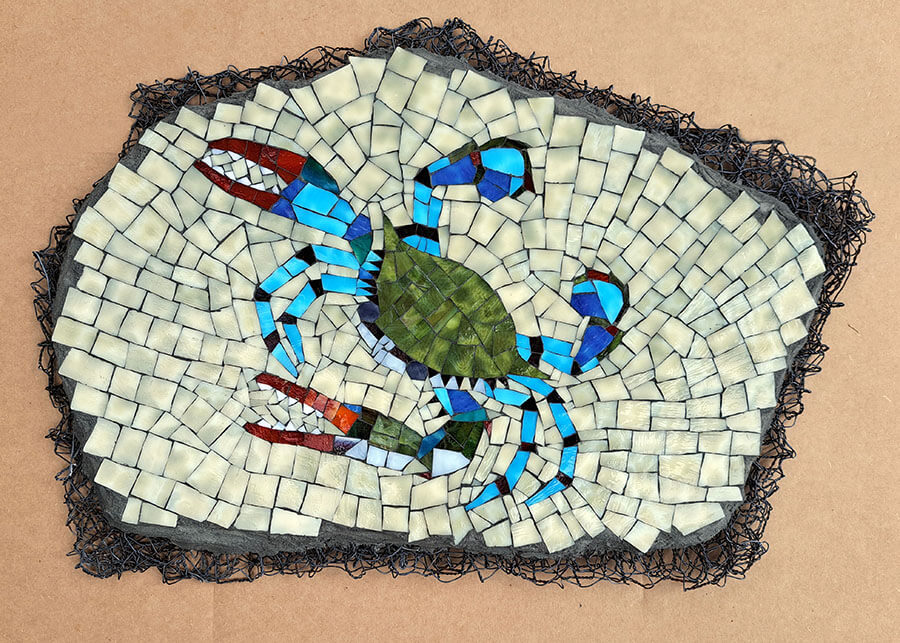
My dear old friend Jay Brown had been requesting a mosaic of a blue crab for years, and this past week Jay had his official investiture as a federal judge, and so I decided it was time.
Art with a Capital A
Normally I avoid bespoke commissions like the plague because I have trouble keeping to a script, even when I write the script.
I have done so much engineering work with rigid specs that it is important to me that my art be its own animal and go where it wants to go. I tend to make things only when I feel driven by mystical-religious type impulses.
I also seem to be unable to keep things easy no matter how much I plan to do so at the start of the project. I just start exploring, and the Blue Crab Mosaic was no exception.
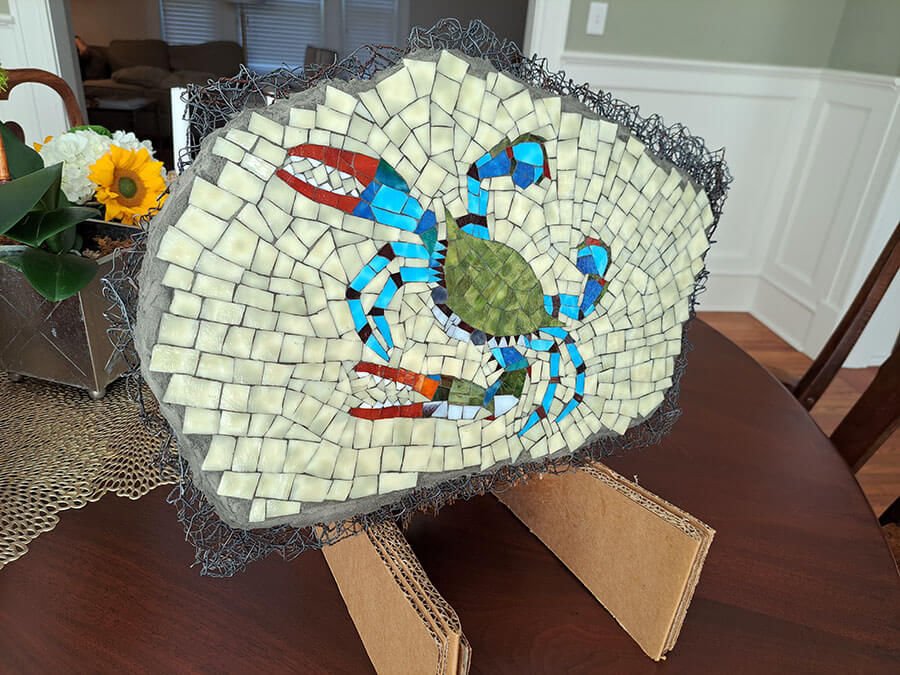
For this mosaic, I had originally planned for the backer to be relatively lightweight and simple because I suspected Jay would want to hang the mosaic on a wall instead of using a desktop easel.
But instead of following the KISS principle and just using a foam-core tile backer board, I decided I would give in to my personal aesthetic preferences and make the backer look like the work was a salvaged piece of an old mosaic mural or floor.
At first I lied to myself. I said that yes I could use chicken wire and concrete made from fine pea gravel and thinset mortar to make a backer that looked like a broken slab of reinforced concrete, but I would keep it THIN, around 1/2 inch.
Of course I didn’t do that.
Of course the homemade concrete backer is over 1 inch thick.
BUT with the extra thickness, it looks more like a chunk of salvaged concrete fascia.
I love found relics and I love art that “leaks” out of conventional frames.
I think this mosaic was very successful in those regards.
Higher Resolution
Here is a higher-resolution image of the Blue Crab mosaic:
Sequence of Making
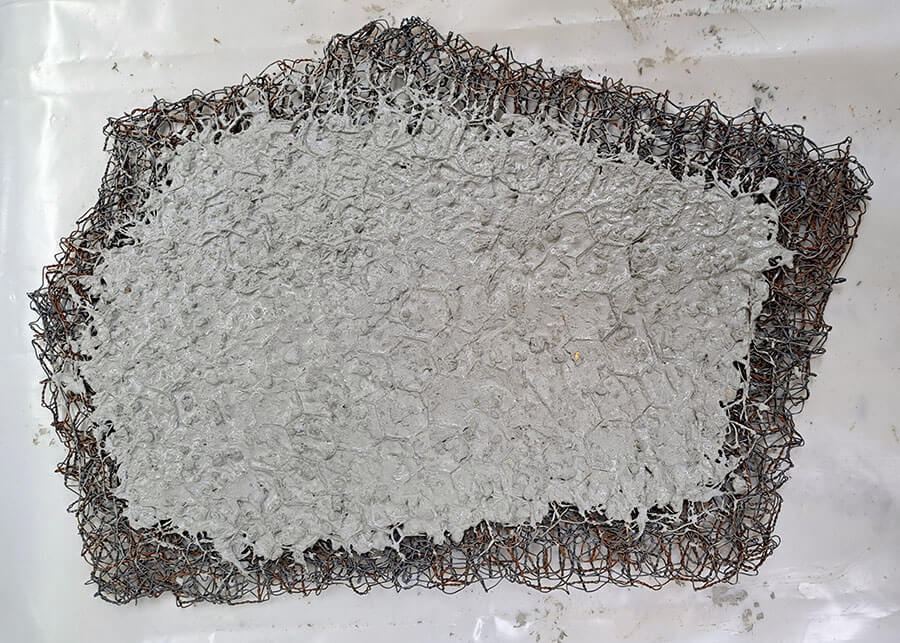
First I made a panel of folded chicken wire made from many plies of the wire folded and “hammered” flat by placing it on the concrete floor and walking on it repeatedly after each new ply was added.
Then I mixed up some Versabond brand thinset mortar with fine pea gravel to create an extra hard concrete and pressed this into the wire.
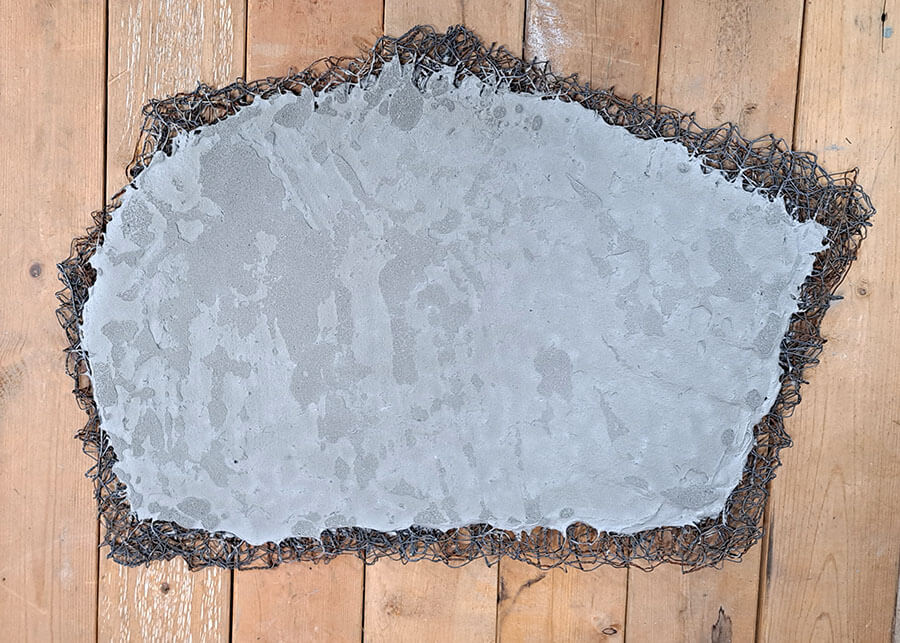
After allowing the initial concrete to harden and “thin” (contract in thickness) for 3 days, I plastered and smoothed the rough concrete surface with thinset mortar.
Note that I got the concrete wet and allowed the surface to dry before plastering with mortar. What this does is ensure that the inside of the concrete isn’t so dry that it sucks all the moisture out of the thinset while it is curing.
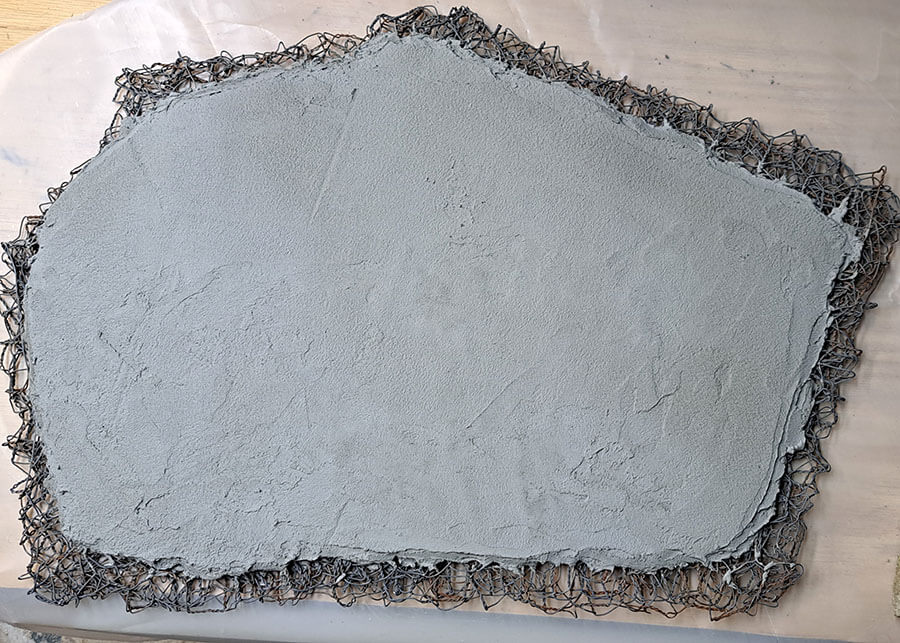
After waiting 3 days and allowing the first coat of mortar to harden and thin, I applied and second coat of mortar.
For both of these coats of mortar, I made sure that I didn’t leave any places where the mortar was so thin that it couldn’t harden properly. In practical terms, that means about 1/8 inch or thicker.
When there isn’t any tile on top of the mortar, the mortar can dry out as it attempts to cure, and so thin places tend to flake off.
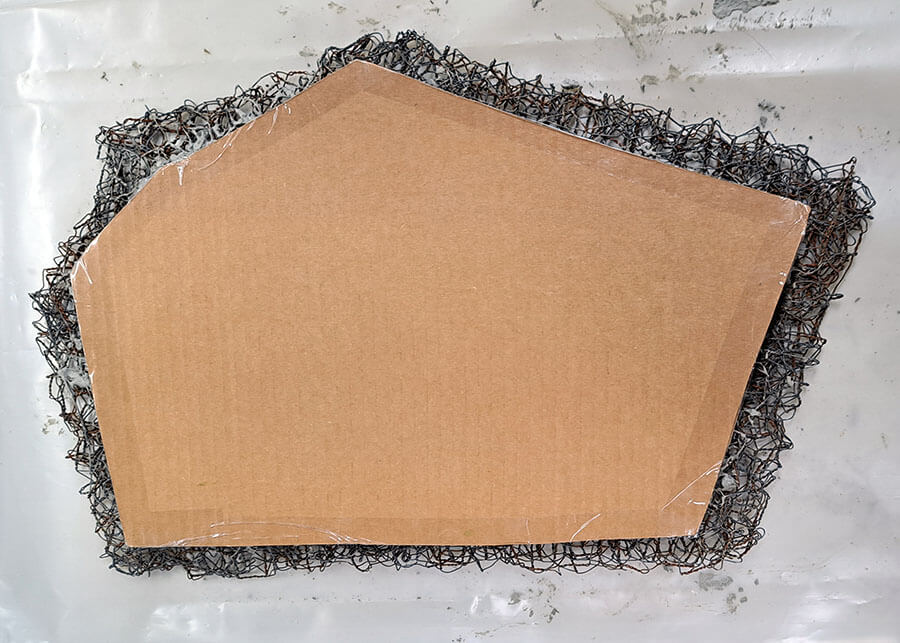
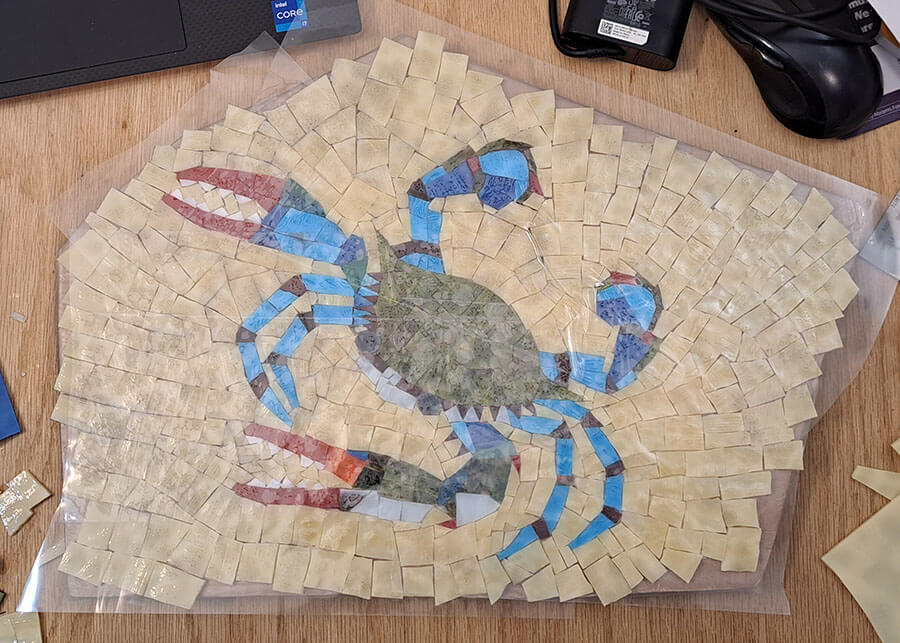
Before I started applying mortar to the chicken wire, I made a template of the area that would be concrete so that I could start working on the mosaic without having to wait of successive layers of mortars to harden for 3 days.
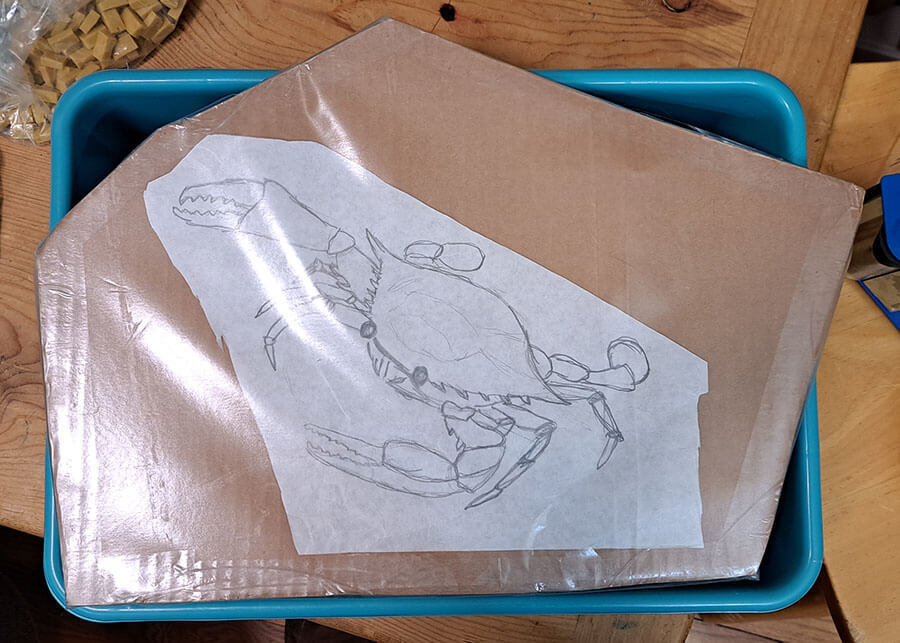
The pattern used for a mosaic is referred to as a “cartoon,” and generally these cartoons resemble the outlined images from a child’s coloring book.
I taped my paper cartoon to the template and then wrapped it with clear contact paper WITH THE STICKY SIDE OUT. I taped down the edges of the clear contact on the back of the template.
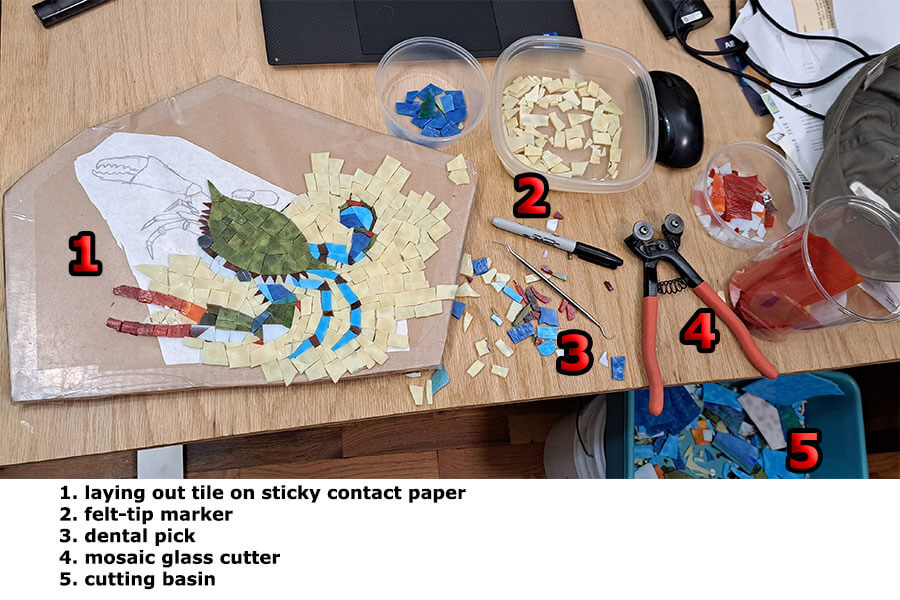
The sticky contact paper keeps the tile from moving around while you lay them out over your pattern.
A felt-tip marker of the Sharpie brand is great for marking glass with the lines of cuts to be made.
A dental pick is indispensable for lifting tiles out of the mosaic when they aren’t quite right.
All of that glass was cut from our 6-inch stained-glass cutting sheets.
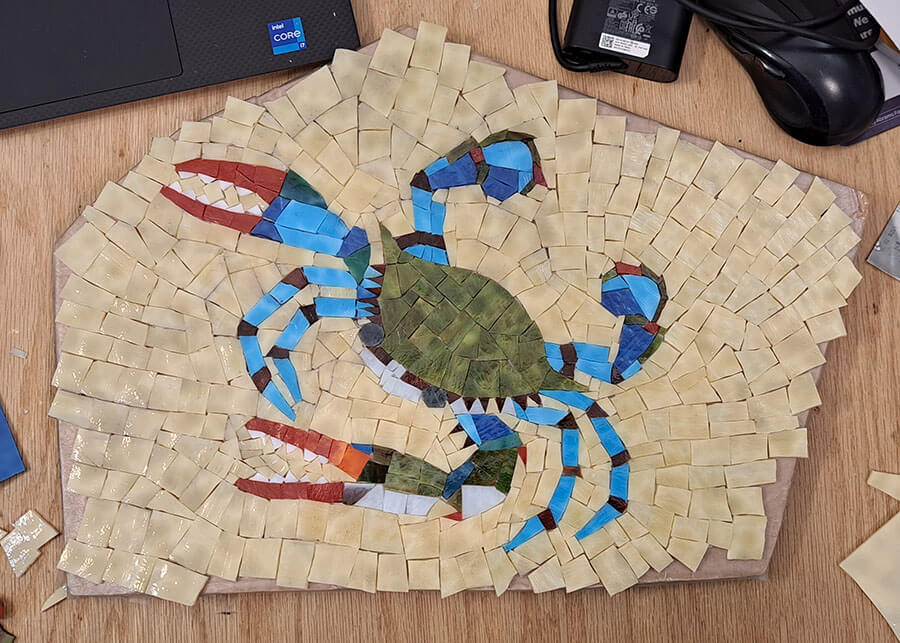
This is the first draft of the mosaic. When the backer was completed, the edges of the mosaic were evaluated for how well they fit on the backer and reworked as needed.
Once the mosaic was revised as needed, clear Mosaic Mounting Tape was applied to the face of the mosaic, which was then lifted off the contact paper and template.
Test Specimen
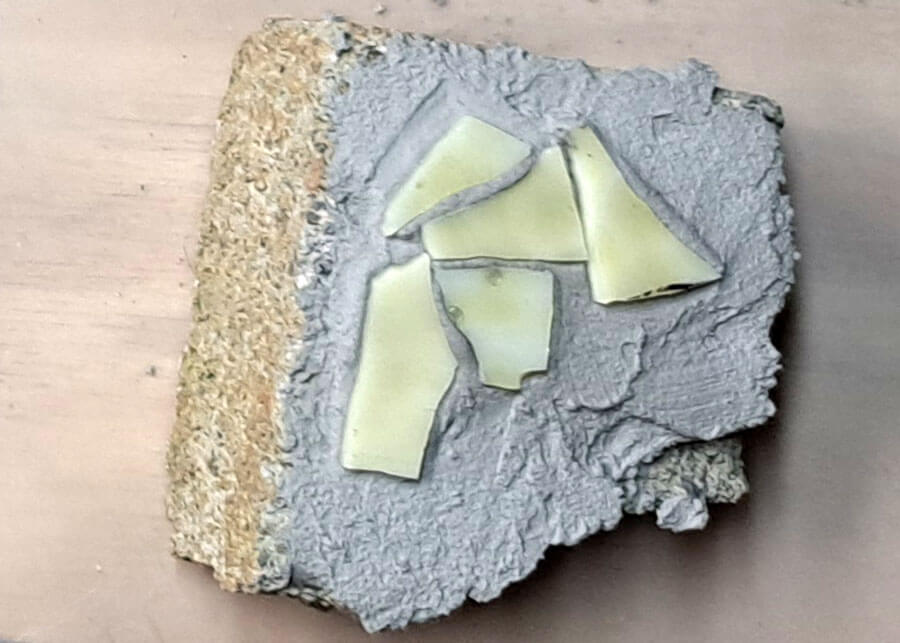
Before I mounted the mosaic, I tested the thinset mortar to make sure it wasn’t too old and that it still had good adhesive properties.
The test specimen above adhered very well in spite of the mortar being mixed improperly. When Versabond gray thinset mortar is this light in color, it is a sign that too much water was used.
My statement about the light color seen in the photo and excess water applies to that brand of thinset. (Other brands might normally be this light in color for all I know.)
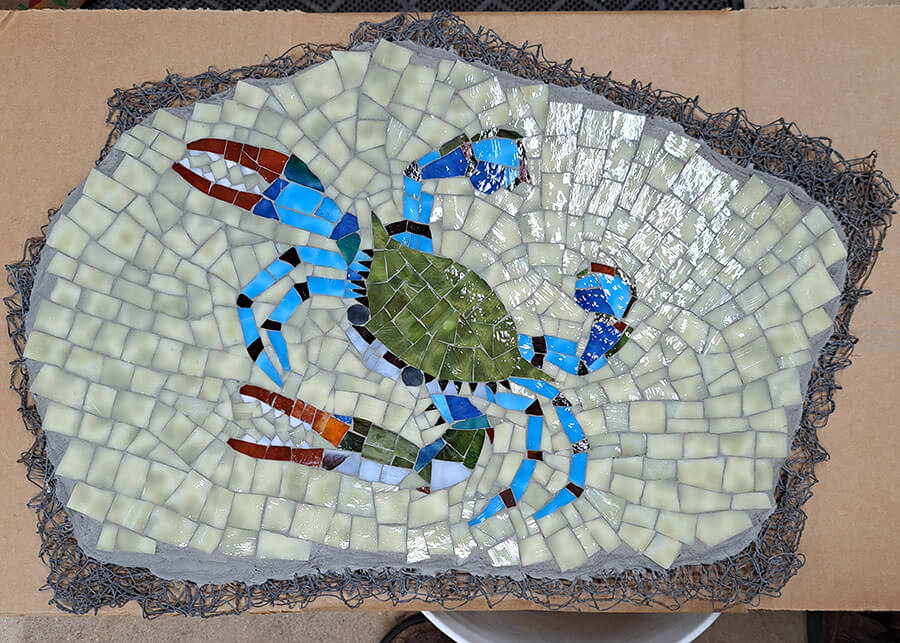
After I mounted the mosaic and allowed the mortar to harden for a few days, I grouted the mosaic in the few places where the mortar didn’t press up and fill the gaps.
A Caveat
Using thinset mortar as grout isn’t something recommended by the manufacture or even mentioned positively or negatively as far as I know.
For architectural jobs make sure you use grout for grouting. Just to be sure.
My point is that you can take some latitude in art projects that you shouldn’t take in architectural projects.
When you use standard materials and methods, you don’t have to worry as much about unexpected failures, such as the potential for something to leach out of the thinset mortar over time. Or for it to stain in an unexpected way. Or whatever.
Improvise in your design not in the technical specifications for architectural coverings.
The Easel
After the ceremony at the court house, there was a large reception at MOCA Jacksonville followed by a low-country boil at home.
The low-country boil with close friends and family was where I surprised Jay with the mosaic, which I did as low-key as possible, but it was still more of an audience than I would have preferred.
The problem was that I forgot the desktop easel for the mosaic.
So the night before the event, I made a desktop easel from laminated cardboard, using two flattened boxes and a bottle of Weldbond glue that happened to be in my truck.
I didn’t photographed the easel from behind because it was ugly, but I regret not taking a photo. The design was simple yet strong.
The single cross member was made from every remaining piece of cardboard laminated together into a rectangular block and positioned so as to minimize flexing and to lower the center of gravity of the easel.
The easel also has long feet so that the mosaic could be displayed leaning back more, which would be important if the easel were placed on the floor instead of on a table top.
You don’t have to have a couple of engineering degrees to make art in new mediums on short notice, but it really helps.
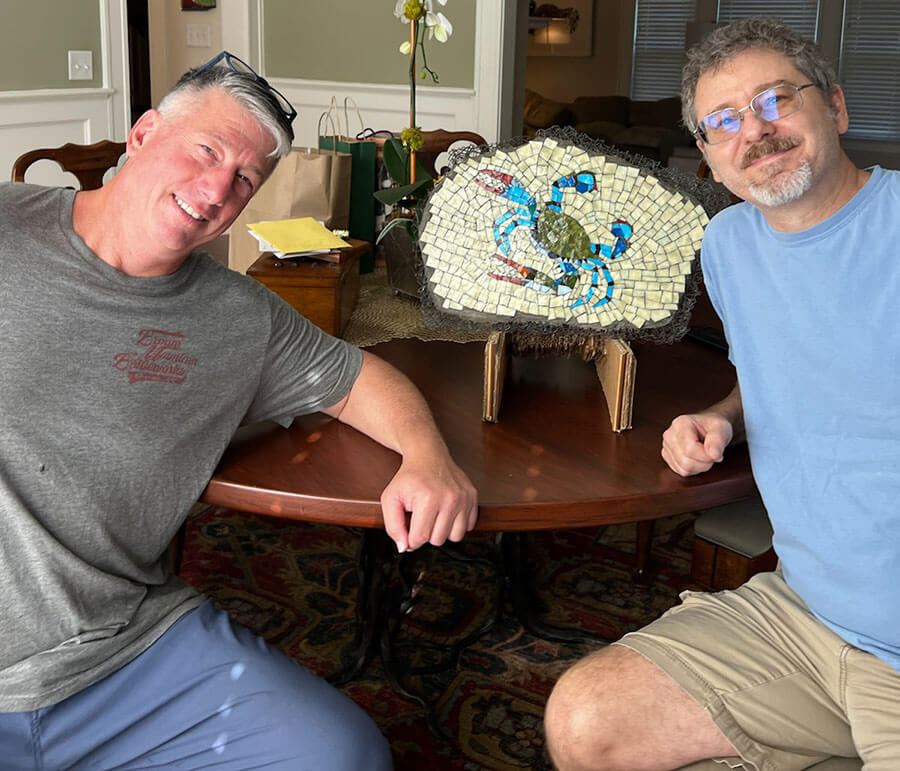
In an age of cynical demagoguery, it is very reassuring to know that people of such high character can succeed and be appointed to high positions.
I’ve long known that Jay is a leader in different groups and community causes, and that he has done a lot of good for various people around him, but the ceremony at the federal courthouse really was something special.
Some people just have a positive impact on the people around them, and the stories came out that day.
Leave a Reply