Artist Sandra Christie of Married Metals emailed me some questions about an outdoor mosaic she wanted to make for her garden area in Connecticut.
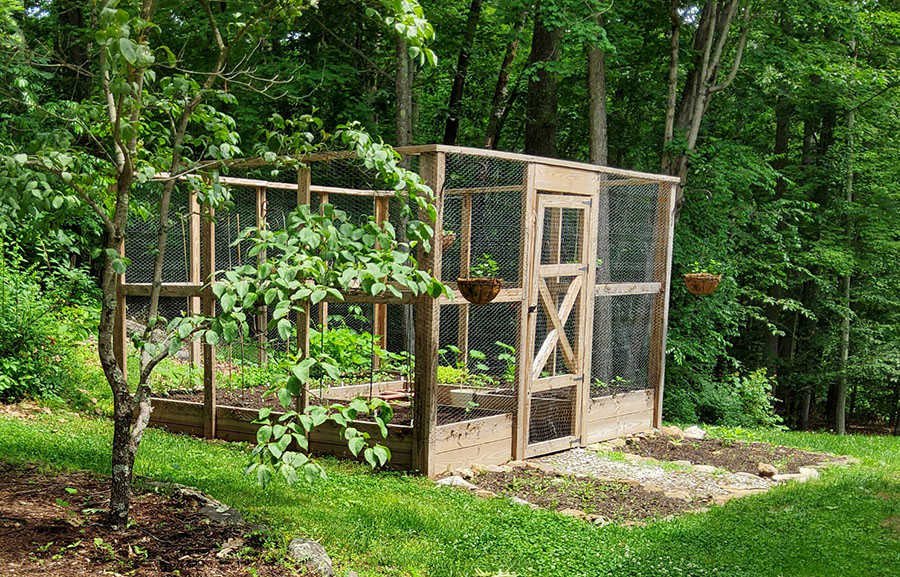
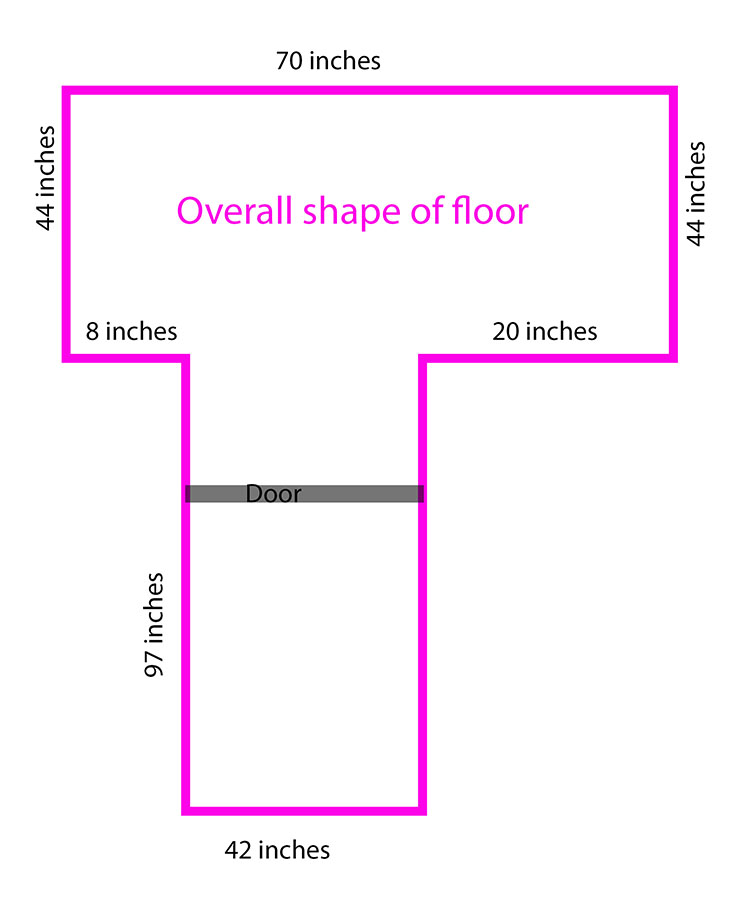
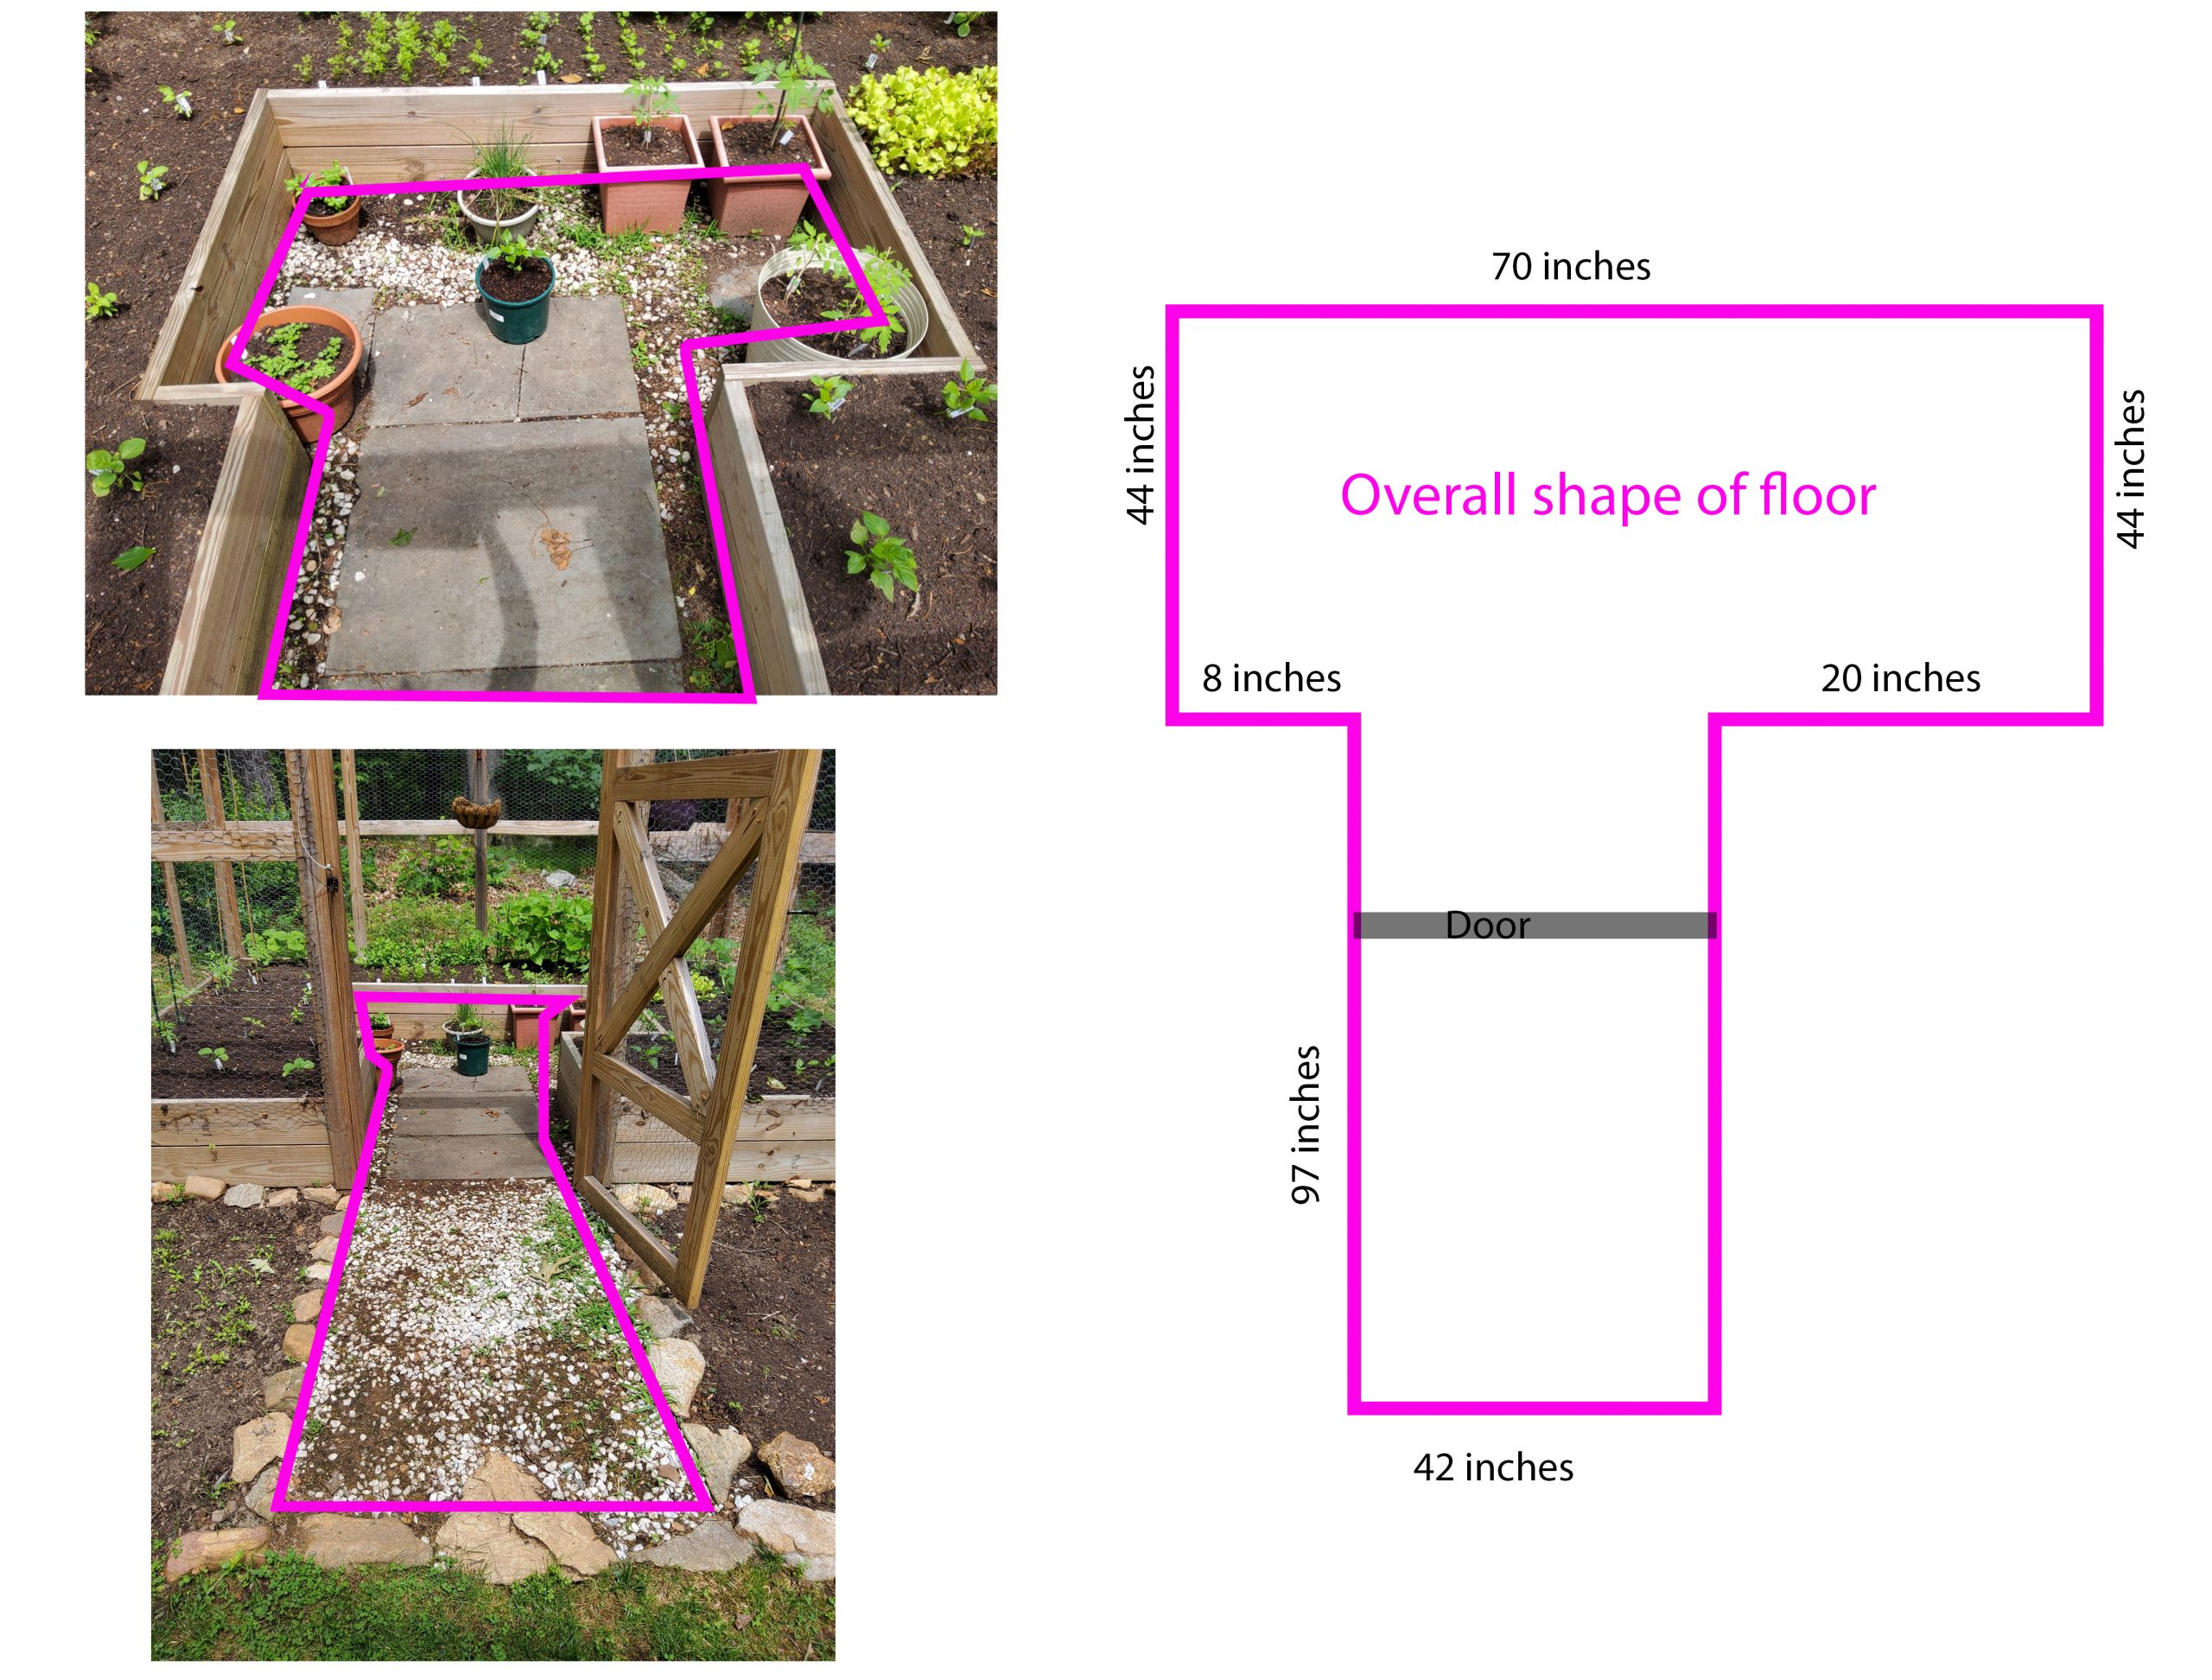
The mosaic will be on a 50-square-foot slab of concrete that will be poured to make a short walkway into a fenced garden area.
Sandra’s initial questions didn’t emphasize drainage in particular other than to say it would be exposed to a fair amount of water, but I am so glad my initial response was mostly about drainage.
I’m also Sandra didn’t understand what I meant at first because it caused an important exchange. There turned out to be some significant details to work out that I didn’t consider until Sandra emailed me back with some pictures.
Drainage Critical
Part of the mosaic is below grade on three sides and portions of the fourth, with wooden retaining walls holding back moist garden soil.
That part of the walkway is to be perfectly horizontal, which further complicates the problem.
With as much precipitation as Connecticut sees in a year, that part of the slab will need efficient draining even if a mosaic isn’t installed. Otherwise, it would probably stay damp and mossy and moldy.
Fortunately the walkway leading up to the fenced garden area is sloped up the hill, and so that part of the mosaic would drain naturally.
The slope just outside for doorway also means there is a place to drain the water from the part of the mosaic that will be inside the fence and problematically level.
This drain could be as simple as leaving a 1 or 2-inch-ish gap between the edge of the concrete slab and the wooden retaining walls, and filling the gap with pea gravel and a perforated PVC pipe at the bottom. The drain pipes could run out of the soil on both sides of the door, emptying on the sloping lawn.
That construction is called a “curtain drain,” and it is simple to make, but it might not be enough to accommodate the amount of precipitation that Connecticut receives.
A trough drain with grated lid might be required, especially if the surface inside the doorway is made perfectly level.
Why Perfectly Level?
But why does that part of the walkway have to be perfectly level?
Can’t it be sloped slightly, say a difference of only 1 inch in height from the side at the top of the “T” down to the side nearest the doorway?
It wouldn’t have to be sloped as much as the portion outside the doorway to make a significant difference.
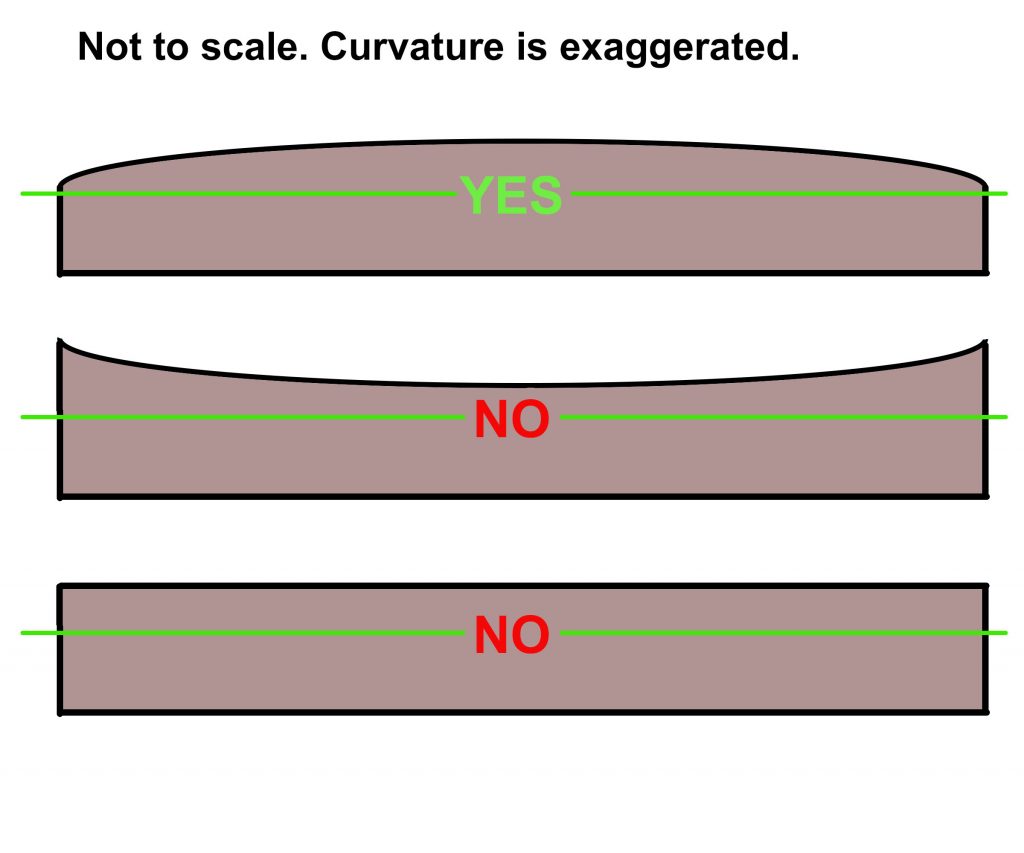
If an outdoor slab for mosaic artwork must be made level, make sure it is slightly convex (domed) not concave or flat.
Domed Not Concave
Mosaics last longer when water can drain away efficiently and not pool on the surface
Perfectly flat and level surfaces should be modified if possible before installing an outdoor mosaic.
That might not be practical for something large like an existing patio, but smaller projects like garden benches are easily modified and should be to ensure the life of the mosaic.
I have details about rounding the horizontal surfaces of mosaic garden benches at the bottom of this article.
Glass Tile for Exterior Mosaics
Sandra’s initial question was whether or not the 3/4″ Morjo Vitreous could withstand light foot traffic and the freezing winters.
The answer is yes they can, but I prefer the 12mm Morjo Recycled because it is tougher and cuts more cleanly. Both are glass and frost proof and won’t freeze crack like porous ceramics and marble will.
The actual concern is the mortar and the concrete, which are vulnerable to the products of organic decomposition, which are acidic.
An outdoor UV-resistant tile and grout sealer can be applied to the mosaic, but it can only do so much if the mosaic is constantly exposed to decomposing wet leaves and soil chemistry.
Drainage is key.
Separation of Projects
Sandra told me that there is a 6-inch drain pipe running under the garden area, and she was considering having the drain from the mosaic pathway empty into that pipe.
I recommended not doing that for several reasons, but mostly because the 6-inch drain pipe was carrying downspout water from her house’s gutters and thus a critical system.
Drainage from the garden area could overload the pipe in heavy downpours and be a source of clogs and a source of future complications.
Multiple simple drains are easier to trouble shoot and replace than one integrated system.
The extra capacity is good too.
Anyway, I’ve found that my art projects go best when I keep them insulated from other house projects.
UPDATE
Sandra tells me that they have decided to go with a central drain similar to a large shower stall with its own designated 6-inch pipe that empties into the wooded slope at the edge of the lot.
Other than a slope, a drain is the best way to ensure that the semi-enclosed sunken area stays dry.
You only have to make sure you regularly clean out the leaves and detritus, which build up quickly in places with a lot of rain and vegetation.
The deciding factor is that a pipe to the woods from a large central drain keeps the dip in front of the garden from becoming overwhelmed with runoff and soggy.
I think it’s well worth the work of trenching for the pipe.
Pre-Mosaic Prep
Sandra also asked me if it was better to make sure the mosaic was installed soon after the slab was poured.
I told her that as long as she washed and scrubbed the concrete with a brush, she could install the mosaic next year after she had all the other work completed.
The surface can’t be dirty for the mortar to get a good bond. That includes cracks, crevices, and pores. A slab surrounded by garden soil and below grade would definitely need a good brushing using a wire brush.
New concrete sometimes has a weak top skin layer of a millimeter or two if too much water was used in the mixing of the concrete.
I use a water hose and old broom to remove this before mounting the mosaic. I brush until the water is clear.
Mosaic Quilt
I highly recommend doing a mosaic stepping stone first to work out your materials and methods before attempting a large outdoor mosaic.
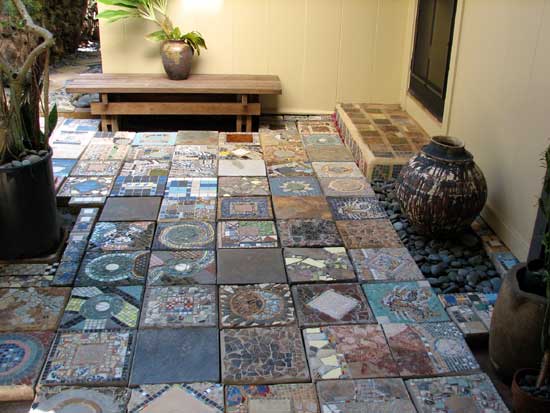
You might decide to do the whole surface with a quilt of mosaic stepping stones, which is very enjoyable, low stress, and produces great results:
Mosaic Benches
You can use mortar mixed with very fine pea gravel to put a slight dome on the seat of a concrete bench instead of mosaicing on it plain and flat like you found it.
The key to making it work is making sure that the edges of the dome you add are at least 1/4 inch thick so that there is enough mortar at the edges to harden properly.
A layer of mortar that thins all the way to nothing at the edges will chip up at those thin edges because the mortar dries out before it can harden chemically.
The center of the dome on a flat bench seat could be as little as 1/2 or 3/4 inch tall.
The dome doesn’t have to be steep or thick, just the opposite. The goal is to make it just rounded enough for water to run off the surface.

Leave a Reply