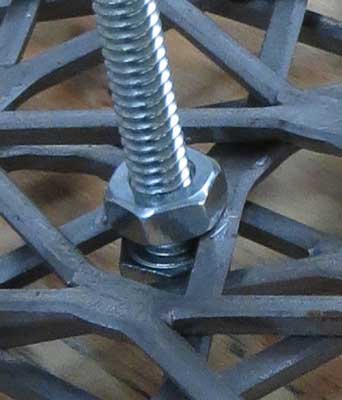
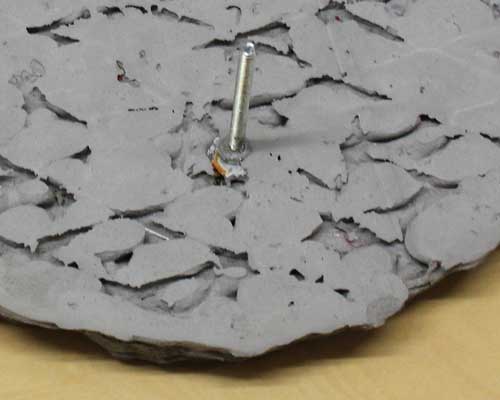
In the last section of one of my previous posts, Custom Shapes For Mosaic Backers, I showed some pictures and instructions for how I used 3/4-inch expanded steel to make a backer for an outdoor mosaic. The expanded metal was welded together in 3 plies, some mounting bolts were welded to this, and then the expanded metal was coated in thinset mortar fortified with very small pea gravel to form a solid surface. (Note that the assembly was cleaned with a wire brush to remove oils and dust before the thinset was applied.)
Built To Stop A Tank
I used this method of making a backer with built-in mounting bolts for two reasons: First, I could make the shape irregular and still have very strong edges without a metal border (which could have been welded on before applying the thinset if needed). Second, I wanted the backer itself to be incredibly strong because I wasn’t making a sign. I was making a backer for a found-object mosaic, and I didn’t want there to be any possibility of the backer flexing and cracking artifacts or not being durable. Third, I wanted the mounting bolts to be integrated with the backer itself and not secured by some separate frame which held the backer.
Some Lighter Weight Options
One negative consequence of making something this strong is the resulting weight. However, there are some options to bring down the weight considerably. The first option would be to use a lighter gauge of expanded metal, or maybe only using one ply instead of three plies and then wrapping that in hardware cloth before plastering with thinset. Another option would be to use the Wedi Board product or a concrete backer in a frame made from 3/4-inch angle iron and weld your mounting points to the frame. I don’t think I would use concrete backer board for this latter option because the edges tend to be crumbly. I would probably use light gauge expended metal coated with thinset even if I set this in an external frame.
Backer In An External Frame
If you do go the route of mounting a backer in an external steel frame, there are several things to consider:
First, remember to paint the frame with at least 3 coats of oil-based outdoor paint after all welding is done and cleaned, including all mounting studs and devices needed to lock the backer board into the frame (such as nuts welded onto the frame to accept a small bolt that keeps the backer from slipping out).
Why you need a locking device: You cannot rely exclusively on an adhesive means of keeping the backer in the frame because the backer could potentially delaminate over time. Depending on the size of your mosaic, you may need to use a heavy gauge of angle iron or nest two pieces for each element of the frame.
Estimate the weight of your finished mosaic and make sure the frame can support it. Make sure the the corners are double welded and make use of corner braces to help ensure that the bottom of the frame doesn’t pop off if the frame rusted badly over the years.
For added effect, make the frame part of the art and not an afterthought or just a default to a conventional rectangular frame. Consider a frame that grasps a reinforced backer at several key points instead of a more conventional frame that wraps all exposed edges. Of course, that requires a thicker backer, or at least a backer with a hollowed-out back and thicker outer edges.
Mounting Bolts Welded Directly To Backer Skeleton
If you decide to use my approach of creating an expanded steel skeleton covered in thinset mortar with mounting bolts sticking directly out of the concrete, then you need to weld the different plies of expanded steel so that they provide a good place for the head of the bolt to be attached to the central ply of steel.

Make sure you use a carpenter’s triangle to make sure your mounting studs are vertical. Sometimes you have to tack weld the bolts in place and then bend the weld slightly to get them straight.
Another concern is the potential for the mounting studs to rust over time. The water running off concrete tends to be slightly alkali and corrosive to steel. I would spray paint the back side of the backer, especially around the mounting studs. You should also consider using larger gauge bolts for your mounting studs.

Before I began mounting the mosaic tile to the backer, I would make sure that the edges of my backer were finished properly and apply extra thinset to cover any bare expanded steel sticking out so that there aren’t any safety or corrosion issues over time. Of course, this is easiest if you did a proper job of welding and cleaning the edges of the expanded metal so that there aren’t any sharp points to begin with. Make the edges of the metal skeleton as robust as possible with thick globular welds and clean these thoroughly.
Mounting Mosaic Signs
There are some comments at the end of my post about Custom Shapes For Mosaic Backers, that discuss the issues involved in mounting a mosaic sign to a masonry wall.

Leave a Reply