Tag: large mosaic
-
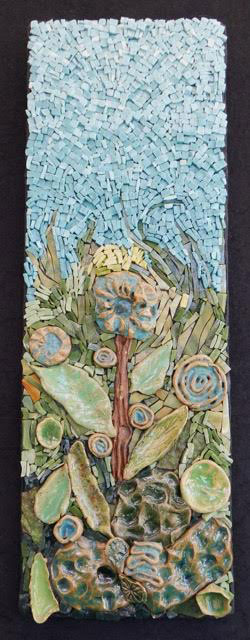
How To Add Texture To Mosaic Art
Mosaic artwork can include rough textural elements that would be impractical in architectural tiling such as a shower wall, which needs to be smooth for cleaning and safety. Note that smooth does not mean flat. You can have textural elements in an architectural surface, but they need to be rounded and not jagged. (Cheese-grater walls in the shower or even your hallway would be problematic.)
SerendipityFor the past few months or more, I have been meaning to create a mosaic which uses cut pieces of tile mounted on their side so that I could demonstrate how a “hand-cut” smalti look and feel could be created with ordinary molded mosaic tile, which is significantly cheaper than smalti. But work and other art projects kept getting in the way, until finally one day out of the blue artist Dee Ruff emails me some pictures of her work, and they illustrate exactly what I had in mind!
“We Are Stardust” Mosaic Side View by Artist Dee Ruff shows the beautiful texture and hand-cleaved look that can be had from ordinary molded tile. “We Are Stardust Mosaic” by Artist Dee Ruff includes a “portal” (glass panel painted on the reverse side). Mixed Media and Texture “In the Garden” Mosaic by Dee Ruff features ceramic figures by Atlanta-based artist Martha Coursey. “Nature” Mosaic by Dee Ruff includes a stained glass inset that matches the “color wash” gradient of the tile.Dee’s “In the Garden” mosaic really caught my eye because I have always been drawn to mixed-media mosaics and mosaics where the work lines of the background interact with figurative elements in the foreground. This mosaic has both. Plus as a subtle color wash gradient in the background. Plus a hand-cleaved texture made from molded recycled glass tile that was cut and mounted on edge. (It was almost as if this mosaic were made to order for me. Imagine my surprise when Dee emailed it to me.)
Dee says “in the Garden” is one of her favorite pieces. Note that the flowers are made from ceramic figures by Atlanta-based artist Martha Coursey, who does amazing work. I like how the smooth glazed ceramic pieces contrast with the rough cleaved texture of the sky.
Backers, Substrates, and MountingDee makes her panels from recycled expanded polystyrene (Styrofoam) covered in alkali-resistant fiberglass mesh and multiple coats of thinset mortar colored with concrete dye. The “hollow” core makes the substrates lightweight, and the skin of thinset and mesh makes them strong and tough (impact resistant). Dee says that she builds the mounting hardware directly into the skin so that it is anchored by layers of thinset reinforced by fiberglass mesh.
Dee uses the Wedi brand of hardware, but brass picture hanging rings sold by building material stores should work, provided you use the heavier gauges. Note that no mounting hardware will be strong enough if you hang them on a nail in drywall, which is weak and fails easily. Nails or screws for mosaics and paintings of any size should go through the drywall and into the stud inside the wall (use a stud finder) or in the crown molding at the top of the wall with a hooked rod hanging down.
Note the safest and most robust mounting system is probably the French cleat. See Natalija’s Instructions for French Cleat Mounting.
More Of Dee Ruff’s ArtDee Ruff currently has work available at the The Mosaic Love Gallery in Jonesborough, Tennessee. Dee’s website is Black Cat Mosaics, and she has some interesting multimedia mosaics and collaborations online there.
-
How to Hang Mosaic Art with French Cleat Wall Mounts
Small mosaic plaques can be mounted on a wall with a the same type of hangers and wires used for paintings provided the nail on which it hangs is mounted in a stud inside the wall, and even then redundant wires and fasteners are recommended. However, larger mosaics need more robust mounting hardware. The “french cleat” is a type of wall mounting that can be used to securely affix heavy mirrors, cabinets or artwork to a wall. In addition to its strength, the french cleat also allows mosaic art to be mounted flush against the wall and makes leveling it easy.
If you built a frame on the back of your mosaic as described in this tutorial, then french cleat molding is a good hanging option.
-
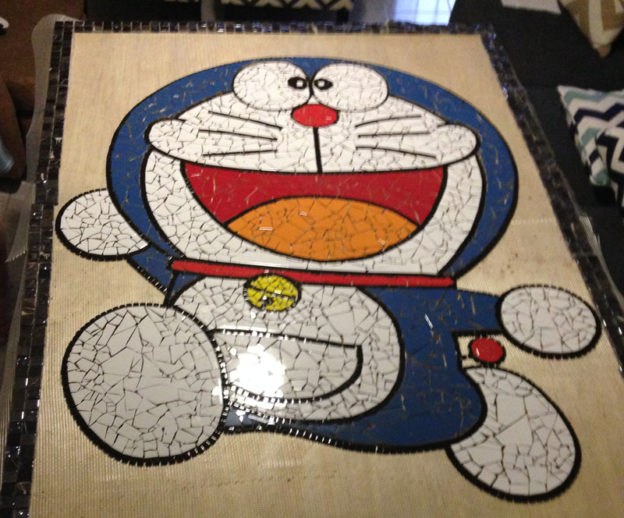
Doraemon Japanese Manga Mosaic Installation Video
Rolando Jose made a mosaic of his favorite cartoon character Doraemon using broken pieces of glazed ceramic tile obtained locally in Panama and our black 12mm recycled glass tile for outlining. Rolando Jose made a video of creating and installing the mosaic and used Doraemon’s theme song for the soundtrack. Doraemon is a Japanese manga character.
The Birth of (Rolando Jose’s) DoraemonThis mosaic seems to have been what I call a “passion project” for Dr. Rolando Jose Rodríguez De León, who is a media and communications professor specializing in animation at the University of Panama. Like many passion projects, Rolando Jose’s results are impressive in spite of the lack of experience.
Passion Projects“Passion project” is a term I use to describe one of these art projects where people have spent years or most of their lives thinking that one day they would finally make a mosaic mural or a sew a quilt or do some other big project in a medium of art they have never done before. Usually what happens is one day they can’t put it off any longer, and suddenly they have started the project. For this reason, there usually isn’t a lot of preliminary research beyond finding basic tools and methods, but any lack of knowledge is more than compensated by the artist’s willingness to figure things out as they go along and experiment as needed.
Many times these new mosaic artists work without knowing all the basics or the most efficient ways of doing things, but they don’t fret if things take much more time and effort than what they had originally anticipated, and they often work around difficulties and setbacks that would discourage a more experienced artist. Their passion for what they are doing bears them up and keeps them happily moving forward.
I love it when people email me pictures of their passion projects. It reaffirms my faith in the mosaic supply business and humanity in general!
Humidity Warps PlywoodRolando Jose mounted his mosaic on a sheet of marine plywood so that it could be taken with them if they move. Hardiboard and concrete backer board are preferred outdoors and in wet locations. Humidity makes plywood warp and delaminate. If you do use plywood outdoors, use marine plywood and paint the back side and edges with three coats of exterior paint (oil-based preferred). Don’t paint or seal the face of the plywood with anything except the same type glue you will be using because you want the tile attached directly to the backer. The finished grouted mosaic should be sealed with a tile and grout sealer from the building material store.
Mosaic Doraemon in progress Should You Use Fiberglass Mesh?Fiberglass mesh is used to lay up mosaic designs as sheets of tile in advance of the final installation. If you are mounting the mosaic on a panel or table top, then you can skip the mesh and glue the tiles directly on the panel or table top. To do that, you first need to transfer the pattern directly to the surface, and that isn’t difficult. I wrote instructions for enlarging and transferring mosaic patterns using only a ruler.
Mosaic Doraemon being outlined using 1/2-inch black glass mosaic tiles.Rolando Jose laid his mosaic up on fiberglass mesh. To so this, he first taped his pattern to the work surface and covered it with clear plastic so that the mesh would not get glued to the pattern. Then it was just a process of outlining the image by gluing black tiles along the lines of his pattern and filing in the monochromatic color fields.
The Right Tools for the Job The artist adding Doraemon’s blue tiles to the mesh using Weldbond Adhesive. Notice the sheet of cardboard used as an improvised cutting tray. We use shallow plastic dishpans for cutting trays. You can repurpose many common household items for use in the art studio, but specialty tools like tile nippers and marble files are indispensable. Grouting A Large MosaicWe sell convenience-sized tubs of dry sanded grout for use in small indoor art projects. If you think you need more than one of these 2-pound containers, then you should be buying your grout at your local building material store. For large mosaics murals, you need to buy the 60-pound bags of grout. You can buy it much cheaper in these large bags, and you also save on shipping.
If your mural is large enough to require more than one large bag of grout, you should also consider buying a mixing paddle, the kind that fits in an electric drill. Even with a powered mixing paddle, it is still a lot of physical work to mix up that much grout.
The Artist Grouting Mosaic Doraemon. Note the white haze that will be buffed off following the application of the grout. Make sure you press the grout down into the gaps and work it in thoroughly to ensure that no voids or bubbles are left at the bottom of the gaps. -
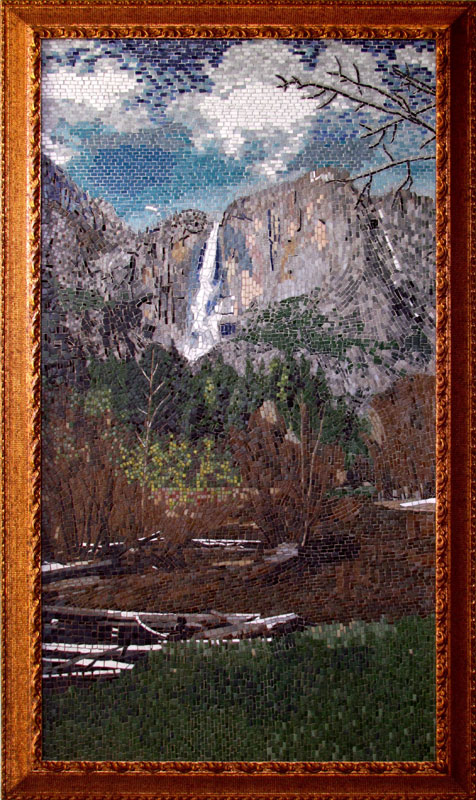
Photorealistic Mosaic Landscape
Yosemite Mosaic Landscape Yosemite Mosaic landscape by Jim Price. Limitations of the Grid and Tile as Pixels
Jim Price’s Yosemite Mosaic is an excellent example of how photorealistic mosaic art does NOT have to be rendered in a uniform grid of pixels.
For an example of a gridded mosaic where tiles are used as pixel, look at the impressive black and white mosaic another artist Mark made of his grandson peering through a telescope. Note the contrast of styles between these two mosaics!
While the tile-as-pixel mode of working is very effective and straightforward for beginners, it limits the artist stylistically because tiles in a grid do not vary in shape and direction, and you can’t do things like arrange tiles in concentric rows around figures to suggest motion. You also can’t use different sizes and shapes to suggest the texture of surfaces. All you have is a grid, and the process of laying tile is all a matter of putting the right color in the right cell.
Alternatives to Grid DesignsYou have more opportunity for stylistic flourishes if you work in a mode similar to stained glass artwork and used pieces with irregular shapes based on the figures being rendered, which usually means larger pieces –but not necessarily. Artist Lorna Ball’s stained glass mosaics are good examples of using small pieces to create realistic textures (bird plumage, tree bark).
I really admire the mosaic Jim Price made of Yosemite because it is photorealistic yet not pixelated, nor does it go to the opposite extreme and render in large pieces like commonly seen in stained glass artwork. Instead, the image is rendered in small tesserae (tiles), and the tile is used in rows that follow the lines of the figure being rendered. Rectangular tile is placed in staggered rows like the classic “subway tiling,” but it is not one uniform set of rows. Instead, different areas and different figures have their own set of rows at a different orientation from those row sets in adjacent areas. To see what I mean, look at where the tops of the cliffs (vertical rows thrusting upward) meets the sky (horizontal rows).
Every element of the composition works well with adjacent areas and objects and contrasting andamento (direction of rows) helps define areas as separate elements. It is clear Jim thought about the row schemes for different elements very carefully and spent a lot of time executing it.
Artists CommentsI wanted to do something big: (24” x 44”). This mosaic took me 20 months to complete, working approx. 3 hours a day using 3/8” tiles. I estimated 13,000 cut pieces. One of my toughest challenges was picking the tile colors. I learned to make do when I could not find all the exact colors I wanted. Grout was also challenging, picking the correct colors – it’s amazing how important grout is and how it affects the overall look of the piece. I used 2 grout colors, grey for the sky/mountains and a medium brown for the rest.
Let the Background Be BackgroundNote that Jim does not make contour lines around the clouds but instead renders the entire sky (clouds and all) using one system of rows of rectangular tiles that define the clouds impressionistically. This is just what the sky needs. The alternative would have been to render the clouds and the surrounds sky with flourishes of different sets of curved rows, but that would have given the clouds too much visual interest and made them look more like elements in the foreground.
Wheat Field with CrowsJim Price made this mosaic master copy after Van Gogh’s painting of the same name, and I think it is good example of the emotion and energy that stylized artwork is capable of and why many people value that type of art over straight realism.
Nearly all of Van Gogh paintings beg to be copied as mosaics because the paintings themselves are already mosaics of heavy brushstrokes that make expert use andamento to convey a sense of motion. Everything dances in a Van Gogh painting, even in his still life paintings, but “Wheat Field with Crows” was a particularly good choice for interpretation.
Wheat Field With Crows mosaic after Van Gogh by Jim Price.Jim made his Wheat Field With Crows using Italian stained glass and says he has the cuts to prove it. I believe him.
Working With Stained Glass and AlternativesStained glass can form razor-sharp edges and slivers when it is cut, some colors more than others because the metal oxide pigments alter the physical properties of the glass. Molded glass tiles such as vitreous and the sintered recycled glass variety are a lot less sharp when they break and don’t produce as many daggers and needles, and so they are better choices when working with children, especially since you can choose to work with whole uncut tile or mostly uncut.
If you do work with stained glass, it is important to remember that nothing else will prick your fingers faster or more often, especially the tiny crumbs and slivers of stained glass that hide on work surfaces. That’s why you keep a vacuum handy and periodically clean off your work area.
Italian Versus American GlassOur stained glass is all American made. I haven’t noticed much difference between American made and the limited number of sheets of Italian glass I have used as far as cutting it and handling it. As far as looks, I have seen sheets made in both countries that were too exquisite to cut up, but it seems like the Italian manufacturers try to make most every sheet swirled to that level of perfection. It seems like a lot of extra money for not much return if you are cutting the glass up small for mosaic art.
The ArtistJim Price lives in Southern California. He has been a graphic artist for 53 years and tried every medium of art before realizing that mosaic was his true love. Contact the artist directly:
Jim Price
Jimprice888@gmail.com
805-584-6272 -
Van Gogh Self-Portrait Mosaic
Recently Doug Harris of Elementile sent me some photos of a mosaic rendering of Vincent Van Gogh’s 1889 self-portrait, and it is definitely worth seeing. I think some of the best examples of how to use adamento in mosaic to convey a sense of motion are actually demonstrated in Van Gogh’s painting, and this self-portrait was a natural choice for mosaic interpretation. I have a photo of the painting at the end of this article.
Mosaic interpretation of Vincent Van Gogh’s Self Portrait oil painting. The mosaic was done by Doug Harris and family of Elementile, with most work being done by his daughter Carly.Note how more than one hue of blue are used in the same field of color: Phthalo blues (cyans) and ultramarine blues (French blues) in multiple shades are combined in differing proportions to render both the clothing and the background. Notice how well the reddish and yellowish browns of the beard work together to create the image of a Dutchman’s red hair and how well these colors contrast the blues.
Color Contrasts And Color MoodVan Gogh’s original oil painting on which this mosaic is based made use of more complex and subtle color fields (after all, he was working in oil paint not glass tile), but I think Carly’s choice to use more blues and more intense blues was a stroke of genius. The blues make a more striking contrast with the beard than the colors of the original painting, and the emphasis on blue is so in keeping with Van Gogh’s work as a whole and his mood and how we think of the artist. I am thinking of both the lonely genius who painted “Starry Night” and the painting itself.
Detail from mosaic interpretations of Van Gogh’s Self Portrait captures the artist’s wounded stare. I like the use of blue in the hair to heighten contrast. Art HappensThe last picture Doug Harris sent me was of the work in progress, and it is my favorite because to me it says a lot about how art happens, at least for most people, including many of the great masters.
Whenever I see advertisements for art retreats and classes in places like Big Sur and Sienna, I am enticed by the idea of going to these picturesque places, but I am also perplexed by the idea of having studio sessions there. I don’t think I could spend any length of time focusing on art while I was in a place of such natural beauty unless I had at least several weeks there. Instead, I would be hiking and exploring with what little time I had available, and I would probably be too busy even to take photos. Keep in mind that someone like me has to check out the local geology, the creeks, the fossils, the artifacts, the indigenous plant life, signs of old home sites, signs of how the land has changed over the years, etc.
Not only that, my mind is already overflowing with creative ideas that I don’t have enough time to pursue. Do people really have to go to some place with over-the-top natural beauty to be inspired to create? For me, it is sometimes difficult to walk outside and check the mail and not spend the rest of the day thinking about landscape painting, especially if there are low rolling gray clouds and yellow leaves shivering in the tops of the poplars.
I like Doug’s photo of such great art being made in a crowded busy warehouse because that is where and how most of my art was made in the past decade or so, and before that it was usually on the floor or dining room table of where ever I was living, even in tiny apartments and hotels during business travel. Some people have to create. It is a need, and they will pursue it where ever and how ever they have to. No trips to Sienna or Rome are required.
Van Gogh Self-Portrait mosaic in progress -on a low table, in what appears to be a warehouse hallway serving as an office/storeroom. When I first saw this photo, I thought that the mosaic was actually resting on the floor itself, a situation which seemed all too familiar from some my own projects. Best Mosaic Artist: Vincent Van GoghTo my knowledge, Vincent Van Gogh never made a mosaic, but I think many of his paintings offer great examples of how to use andamento in mosaic to create a sense of motion and add more visual interest to the artwork. Notice how Van Gogh uses flowing brushstrokes of different colors to build the folds of fabric in the artist’s clothing and how this same technique makes the background dance.
Van Gogh’s original self-portrait oil painting from 1889 on which Doug and Carly’s mosaic was based. -
Mixed-Media Mosaic Bar
Recently artist Wendy Schroeder emailed us some photographs of her mixed-media mosaic bar top, and it is worth taking a look at for several reasons, especially if you are doing a high-end project and would like to integrate figurative mosaic art in a seamless way with other design elements.
Strong Figurative DesignFirst, the glass tile mosaic part of the bar top is a strong figurative design (koi pond with lily pads and lotus) that makes good use of contrasting colors from the color wheel. Wendy also made good use of multiple shades of the same hue to make color fields more interesting. (She used multiple greens for the lily pads and multiple blues for the water instead of just one color for each.) There is also good use of andamento, which is the practice of arranging the tile in curved concentric rows to suggest motion instead of placing the tile in straight rows or grids.
This impressive mosaic bar by artist Wendy Schroeder has a strong figurative design for the glass tile mosaic portion, which is integrated with the other materials and features making up the bar. Notice how well the rounded river stone mosaic works with the glass tile mosaic in spite of being different in texture and color and how the river stone mosaic helps tie in the sink and draining board. Also note the use of thick stone tile to make a border and cover the side edges of the bar top. Figurative Design Integrated With Other ElementsAnother reason this project was successful is that the glass tile mosaic koi pond is well integrated with the other features and elements making up the bar. A second type of mosaic made from monochromatic rounded river stones contrasts the color and texture of the glass mosaic, and it helps tie in the black sink and draining board. Sure the entire bar top could have been covered with the mosaic of the koi pond, but having less of it and having it paired with a contrasting dark material make its colors stand out more.
Wendy’s use of the stone mosaic to limit the amount of colorful glass mosaic is a convincing demonstration of how less can be more in art, and it makes good practical sense too. Pots and pans can be dropped on stone mosaic around the sink instead of on brittle glass tile. Besides, I’m not sure the glass mosaic would have looked as strong if it ran all the way to the sink. It may have looked more like a generic repeating covering purchased by the square foot if it had been used to cover the entire bar top. The irregularly shaped intersection with the river stone mosaic calls attention to the custom aspects of the design.
The artist Wendy Schroeder working on her mosaic bar top. Note that the rounded river stone mosaic is yet to be installed around the sink as are the thick stone tiles used to cover the edge of the bar top. The photograph gives a good overview of the figurative elements. Note the abstract swirls running between the lily pads. The abstract swirl illustrates how curving andamento can be used to interact with figures in a mosaic design.The large boulder construction of the body of the bar underneath helps tie the mosaic bar to the same materials used elsewhere in the cabin.
A Novel Border / Edge TreatmentThird, Wendy’s mosaic bar top has a great solution for the side edges. Instead of tiling it with small glass mosaic, thick stone tiles were used in a way where the tiles extend up to form a border around the mosaic on the top surface. You need to look closely at the first and third photographs to see these border tiles, and only their top edges are visible in the first photo. Note how those tiles have to be as thick as they are to properly form a border around the black river stone mosaic.
A walnut cutting board and brass bin cover are built into the mosaic bar top. Note the thick stone tile used to cover the side edges of the bar top and how these stone tiles form a border around the glass mosaic. Project Integrated With Room DecorThe photograph above shows how a walnut cutting board and brass bin cover were integrated into the mosaic design of the counter top. The thick boarder tiles used to line the edge of the counter top are also used to form a boarder around the sink and brass bin cover. This boarder helps tie all the different components together.
What is equally important to me is how the bar counter top as a whole works with the other design elements in the room. After all, the colors and the materials and the design of the mosaic shouldn’t look out of place in the room where it is being installed. Otherwise it doesn’t matter how well the mosaic itself is executed. Usually this sort of harmony is achieved by using similar colors or materials or motifs or themes in the mosaic. The hardwood floors and stone mosaic used elsewhere in the kitchen help the bar to look “at home” because they are similar in color and texture and design and theme to the bar. Even the modern stainless steel appliances are visually compatible with the bar top because it contains black and gray elements.
From what I have seen over the years, architectural mosaic projects that fail usually do so because the materials or colors or design of the mosaic are not compatible with the decor of the room as a whole. It means a lot for me to say that because I am a figurative artist who paints and mosaics for its own sake, and I hate the idea of shallow people buying a painting merely because it matches their sofa, but art is context and art is design. Things have to be balanced and compatible as a whole in terms of interior design for the artwork itself to be fully appreciated.
“And that’s not all! If you act now, we will include custom lighting!” As if a successful mixed-media mosaic project that worked well with existing room decor were not enough of an accomplishment, Wendy built in custom fiber optic lights BENEATH the glass of the mosaic. My initial emotional response to this piece was pure artistic envy: “Someone has outcrazied me, and I feel threatened.” Drawing The Pattern Directly On The BackerAnother reason I wanted to show off this project is that Wendy got some good photographs of the work in progress, which is something I have been terrible about doing, at least in the past. One of her work-in-process photos shows how she drew her cartoon (pattern or outline) directly on the backer used for the mosaic counter top, which in this case is a plywood surface with some reinforcing underneath.
The outlined patterns used for creating mosaic designs are referred to as “cartoons,” and these can be drawn directly on the backer to be mosaiced if the surface isn’t currently in use. Usually you have to lay up the mosaic design in advance on mounting tape or mounting paper or fiberglass mesh because the surface to be covered is being used during the time it takes to lay up the design. Mounting The Tile Mounting tile on a large project is a time consuming process that ties up real estate in your studio for an extended period. It isn’t practical to pick up and store everything after each working session, so it makes sense to find a room or work surface that can be occupied for the length of the project. All that being said, small mosaic plaques can be made quite easily on a shared table provided you vacuum after work sessions and keep materials stored in trays.Custom figurative mosaic work with glass tile means a lot of cutting, which is easy to do with a mosaic glass cutter, but tiny glass slivers are produced. These can be quite sharp and lie hidden on surfaces until you rub your hand over them. Keep your vacuum handy and cut over an old towel to contain these sharp slivers. Make sure you retire the towel after use or use it exclusively for mosaic.
Thanks Wendy! I really enjoyed showing off your project.
-
Outdoor School Mosaics
Recently I received an email from an art teacher whose school mosaic project was an outdoor mosaic where each child would create a mosaic on an 8 inch x 8 inch brick paver (paving stone), and then the mosaic pavers would be arranged together in a crazy quilt design similar to what artist Victor Kobayashi created for his mosaic patio in Honolulu.
I really like the crazy quilt approach to school projects because it allows each student to make their own art and have a real art experience instead of copying some teacher’s favorite piece of art, which usually involves more boredom or frustration than it does art. Crazy quilt projects also tend to produce more exuberant and impressive results. Copying something is merely copying something, even if that something is an acknowledged masterpiece.
Normally, school mosaic projects can use 1/2-inch or 3/4-inch sanded plywood as a backer, and the tile can be attached using a white PVA adhesive such as Weldbond, but plywood and glue are for indoors only. For outdoor and wet mosaics, you must use thinset mortar to attach the tiles to the backer, and that backer must be cement, stone or masonry. For large mosaics, a sheet of concrete backer board can be mounted to a metal wall using a frame welded from angle iron, or the mosaic can be created directly on a stone or concrete wall or a brick wall plastered smooth with thinset. In this case, the mosaic can be laid up in advance on fiberglass mesh, mosaic paper or clear mounting tape, and then these sheets can be pressed into thinset spread on the wall using a notched trowel.
This particular teacher decided to use brick pavers for her backers, but the concrete stepping stones/pavers commonly sold at building material stores could have been used in a similar way. The real issue for her project was how the students could use thinset mortar to attach each individual tile without creating a huge mess.
Thinset mortar is a sanded portland cement product with polymers added for strength and adhesive properties, so think of it as sticky concrete because that is essentially what it is. Your students might be mature and competent enough to use a bottle of glue that looks and handles just like Elmer’s glue, but how are they going to fare when they start working with sticky concrete? Now that I have your attention and your hair is standing on end, let me calm you by saying that it can be done, and it can be done fairly easily with a little forethought and planning.
One option would be to avoid setting each tile individually and lay up the designs in advance on clear mounting tape using my instructions for using contact paper and mounting tape. Then thinset could be spread on the pavers and the whole design mounted at once.
But that still involves handling thinset and some point, and sometimes you find situations where the mounting tape method isn’t practical (such as when not all of your tile have the same thickness).
Make A Prototype To Answer Basic QuestionsThe key too minimizing frustration and mess is to figure out your process BEFORE you involve the children, and the best way of doing that is to make a prototype in advance. In making a small mosaic beforehand, you work out the details of your materials and methods, including how the thinset will be distributed between the different children and how they will apply it to the backer.
Here are some questions you should answer by making your prototype. Please don’t let any of these alarm you because I have a practical recommendation at the end of this article that greatly simplifies everything and even eliminates some of these concerns:
How long does it take to apply tile to a mosaic of this size?
How many classroom sessions will be required?
Would it be more practical to have longer sessions instead of a larger number of short sessions?
How will thinset be applied to the stepping stones? Will the children spread the thinset themselves?
How will the children keep their hands clean while working; buckets of water and piles of rags?
How will we keep the thinset from drying out in the heated winter air or summer AC? Can we use humidifiers if necessary?
How much thinset do you need to mix up at one time? (This is answered by thinking about how many students will be working at once and how much thinset you used in one working session.)
How will we mix up the thinset? Is a parent volunteer available with a mixing paddle, drill motor and 5 gallon bucket? Do we have any parents who work as contractors and have experience with laying tile or mixing up concrete?
All of these things are relatively easy to implement, but they can make things chaotic or difficult if you don’t think about them in advance.
Thinset And SurfacesThere are a few specific concerns related to using thinset and pavers/stepping stones.
Surface WettingSometimes you can drop a clump of thinset onto concrete backer board and it will harden without bonding to the backer board and it will fall right off or come off with minimal scraping. This was because the thinset didn’t really make intimate contact with the board due to surface dust. This can become more of an issue over time as you work and the thinset starts to set up as you are using it. The point is that sometimes you need to smear thinset into a surface to make sure it adequately wets the surface and makes intimate contact. Normally this happens merely by pressing a tile into the thinset, but you might do well to keep an eye out for students who are minimalists in terms of how much thinset they apply and for those who have a butterfly touch and just kind of sit the tile on top of the thinset instead of pressing it in.
Presealed PaversOne problem you might encounter is pavers or stepping stones that have been sealed with some sort of silicon or polymer that might interfere with thinset bonding well to them. You can test for this simply by dripping some water or spittle on the paver and observing whether or not the water wets the surface. If the water wets the surface and soaks in, then there shouldn’t be any problem. If the water beads up similar to how water beads on a waxed car, or if it fails to soak in, then you know that the pavers have a heavy coat of sealant and should be avoided.
Skin IrritationWet concrete is mildly caustic, so it can dry and irritate the skin. A box of disposable medical examination gloves from the drug store can prevent this. You should also have the children wear safety glasses with side shields.
Overly Complex Designs And A RecommendationAnother thing you can learn from making a prototype is how much time is involved and how simple or complex the designs can be in order to be completed in the time allowed. I definitely prefer children be allowed to make original designs so that they get a real art experience, but you still need to give them recommendations about what level of detail is practical and look out for children trying to make overly complex and detailed designs. For this reason, it can be somewhat problematic for children to sketch out their designs in advance. Sometimes the mere act of drawing gets a person thinking in terms of a level of detail that isn’t practical in the medium in which the design will be executed. I have encountered this time and again while sketching out designs for my painting and mosaic.
Instead of sketching out designs, a more practical exercise might be for the students to play around with arranging tile before they decide on a finished design and definitely before they work with concrete.
I recommend making cardboard squares the same size as the mosaic backer and allowing the children to practice laying up their design on the square. If possible, give them one session to play with different arrangements and experiment with rendering different designs in the square, and a second session to finalize their design.
Then the following sessions could be about transferring the tile to the thinset on the paver. Using this approach, it would be possible for a teacher or parent volunteer to spread thinset on the pavers, and then the students merely transfer their tile designs from the cardboard squares/trays to the thinset, which would greatly minimize the amount time the children spent touching concrete.
A Practical Method For Kids And Thinset Make squares from cardboard that are the same size as the stepping stones/pavers or draw squares the size of the pavers on cardboard or trays. I prefer to cut out the cardboard squares so that they can be wrapped with contact paper with the sticky side out to prevent the tile from moving around. Have children spend one or two sessions arranging tile into designs on these squares/trays. Have teachers or parent volunteers mix up and spread thinset on the stepping stones. The children transfer their designs to the stepping stone one tile at a time. Alternatively, clear mounting tape could be used to pick up and transfer more complex designs made from smaller tile. After the thinset has hardened for a day, grout the mosaics with more thinset or grout. After the grout has hardened for at least a day or two, clean off any remaining grout residue by rubbing with a clean cloth and seal the mosaics with a tile and grout sealer. MORE COMPLICATED DESIGNS?The above instructions were written for children and beginners who just need to play around with tile to make simple designs. However, you may have more advanced students capable of making more sophisticated images from many small pieces of tile. I have written a second article Mosaic Transfer Instructions which explains how to lay up a more complicated design on a pattern and transfer it all at once to thinset or cement using mosaic mounting tape or clear packing tape.