There is ample information online about how to go get sheets of tile from a building material store and mount them over your sink and grout them, which is merely basic tiling. This article is more about how to make an original mosaic design and about some basic questions not covered in most of the instructions I saw online.
How-To Questions
Can I tile over drywall?
Yes, for a sink backsplash. For showers and bathtubs, you should replace the drywall with concrete backer board because eventually someone is going to lean against it, and drywall won’t hold the weight. If the drywall has been painted, you will want to sand off the paint or at least scuff it with some coarse-grit sandpaper, something like 80 grit sandpaper.
Do I need to remove linoleum or formica or old tiling first?
Yes, adhesives and thinset aren’t likely to bond to materials designed to be stain resistant, and you don’t want the extra weight and thickness of the old material underneath.
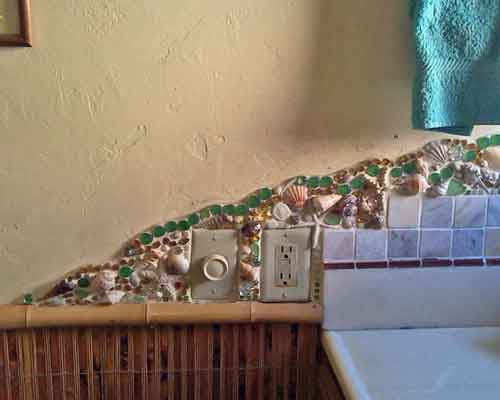
The thickness of the mosaic tile means that my electrical receptacles will be recessed into the wall so far that the covers can’t be attached. How do I fix that?
You would use an electrical box extender (sometimes called and electrical box extension ring). These are available from a building material store such as Lowes or Home Depot. Basically, your electrician removes the receptacle cover, removes the screws that hold the outlets in the electrical box, installs the extender, and then screws the outlets to the extender and replaces the cover. As always, make sure the circuit breaker is turned off and test the outlet to confirm that it is dead before doing the work.
The process is simple and only takes a few minutes, but an electrician can ensure that you don’t accidentally do something that might cause a short over time (such as loosen a wire nut inside the electrical box). I’m a big believer in learning by doing, but electricity can be fairly unforgiving…
Do I need to use thinset?
Unless you are talking about a commercial sink or some other situation where the bottom of the mosaic is frequently standing in water, the answer is no. A high-end brand of white PVA adhesive such as the Weldbond we sell should be more than sufficient if the grout is properly sealed with a tile and grout sealer, which you need to do anyway to prevent staining and mildew.
Of couse, I am talking about attaching small mosaic tile (1″ or less) in an original design, which can be attached one tile at a time directly to the wall, or laid up on fiberglass mesh or temporarily reverse mounted on mosaic mounting paper. Note that our product descriptions for each of these include instructions for how to use them.
If you are mounting sheets or tile from a factory, or sheets that you laid up yourself, then you can spread thinset mortar with a 3/16″ notched trowel and press your sheets into that.
Do I Use Sanded Or Unsanded Grout?
Most of the instructional material I see online says to use unsanded grout to avoid scratching the glass tile, and then other websites say to use the new urethane grouts (which I believe only come with sand) because these are more resistant to mold and don’t have to be sealed.
I’ve never noticed a problem with sanded grout scratching tile, but I don’t use the new popular cheap tiles which are clear glass with enamel color fired on the bottoms. I suppose sanded grout might scratch these because the clear glass is relatively soft and shows scratching more.
Here is what I do know: I regularly get emails from panicky people saying that there are cracks forming in their grout lines as if the grout shrank as it cured, and these people all used unsanded grout. Unless your grout lines are very narrow, the grout needs sand to give it hardness and resistance to impact. Sand in grout is like the gravel in concrete: it isn’t optional if you expect the material to have any strength.
Of course, I am talking about traditional grouts made from portland cement because that is all I use. Maybe the newer epoxy grouts and urethane grouts don’t need sand, but I am unfamiliar. I do know that the working times of epoxy grouts are very short and clean up is more difficult, so you would only use them in situations where you are using ordinary flat tile that could be grouted quickly.
Do I need to seal my mosaic backsplash?
Yes, backsplashes definitely need to be sealed with a tile and grout sealer because they are subjected to occasional splashes, and not just water. There are also food and soap and grease and other materials likely to stain the grout and make it more susceptible to mold and mildew. We use ordinary tile and grout sealers from the building material store. Use multiple applications per the instructions on the bottle a few days after the grout cures. It isn’t complicated or messy. It wipes on and wipes off, and the only thing it does is seal the pores with silicone.
An Inspiring Mosaic Backsplash
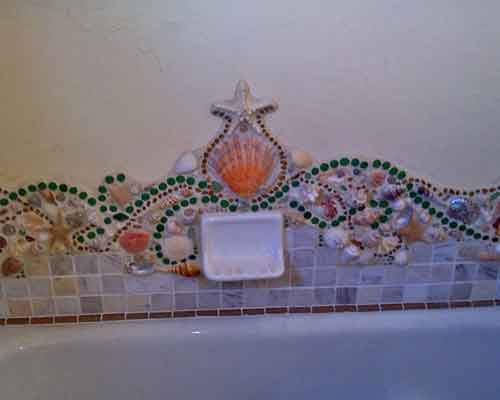
Recently artist Karen Whitney emailed me pictures of her bathroom backsplash, which makes use of seashells and other dimensional found objects instead of ordinary flat tile and has a flowing curved border instead of a rectangular stopping point such as a ceiling or cabinet.
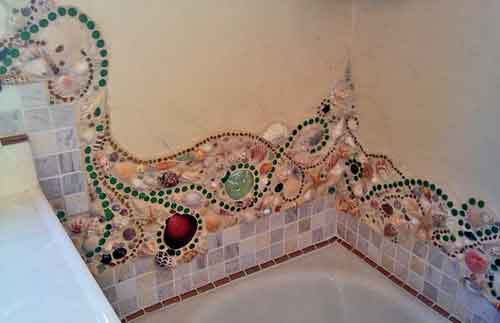
What I like most about this mosaic is the story Karen told me about making it, which involved trial and error, improvised methods and patience. This was how I started making mosaics (and most of the other media I have worked in): minimal information, just the basics really, and a willingness to experiment and see what works.
My first mosaic was made with a claw hammer without even the benefit of a tile nipper. That is how deeply my impulse to create had emerged: I had two engineering degrees and had grown up using all sorts of tools on all sorts of home improvement projects, but when my art finally took full control of my life, it did so explosively, and I worked almost by sheer will alone.
I won’t elaborate on the specifics of Karen’s materials and methods because things have a way of getting repeated out of context on the Internet and being cited as authoritative when they are not. Instead, I want to explain how to make such a mosaic using best practices, which ensure durability and can take a lot of stress and labor out of the process.
Use Thinset Instead Of Grout
People often email me asking if they can press objects directly into grout instead of using the glue-then-grout method. Yes you could, in a way similar to how tile and objects are pressed into concrete to make a stepping stone, but it makes sense to use thinset mortar instead of grout for several reasons:
- Thinset is a powdered cement product that looks and handles more or less just like grout.
- Thinset has strong adhesive properties while grout does not.
- Thinset is much harder and stronger than grout.
There is one important reason you may prefer to use grout instead of thinset: color. Most building material stores carry 30+ colors of grout but only 2 colors of thinset (gray and white). While thinset can be dyed, it is easier to find a grout that is already the color you want, and then you just add some latex additive to the grout to give it adhesive properties. The latex additive is sold on the same aisle that has concrete, and the package will have manufacturer instructions for how much additive to add to concrete (which would be the same for grout). Keep in mind that when you do this, you are essentially turning the grout into homemade thinset.
Seal Faces Before Use
Grout, thinset and other concrete products can stain any porous materials such as sea shells and unpolished stone. To avoid staining by grout, you can seal these items with a tile and grout sealer, which should be applied to the faces only using a small artist paint brush or a rag dampened with the sealer. Note that you will want to do multiple applications and take care not to get sealer on the bottoms of the objects or any place you want the grout to bond to.
This always seems like a lot of extra work to me, so I usually don’t do it, but that means I have to work extra careful when I mount my tile.
Note that Whitney used polyurethane on her sea shells, which might actually be preferable to a tile and grout sealer, which only seals the pores. The polyurethane is an actual coating, and this might do a better job of filling up tiny crevices where mildew and stains could lodge over time. I am unfamiliar with using polyurethane in this way and generally discourage its use on mosaic art because it might yellow or scratch over time. For seashells used in a shower, it might be a necessary risk to take.
Press Into Thinset Instead Of Glue-Then-Grout
Most mosaic is done like ordinary architectural tiling: tiles are mounted with adhesive or thinset, and then the mosaic is grouted by rubbing wet grout over the face of the mosaic and down into the gaps between the tiles. That is fine for ordinary flat tile, but the glue-then-grout method really doesn’t work when you have dimensional objects such as seashells. Of course it can be done that way in theory, but it takes a lot of rubbing to get the excess grout off something like that, and then there is the issue of staining.
That is why I spread a little bit of thinset mortar at a time using a small trowel or palette knife and press my dimensional objects into the bed of thinset. I don’t come back later and grout. Instead, I apply just enough thinset so that some squeezes up between my objects and fills the gap. It requires some trial and error to learn just how much thinset to apply so that an excessive amount doesn’t squeeze up and stain my objects, and that is why you might want to practice mounting a few objects to a small piece of scrap plywood before beginning your project.
I originally used a Wilton brand cake icing bag to fill in any voids a day or two later. Now I just mount the nipple from the cake icing bag onto a grouting bag because it holds much more material. An artists palette knife is also useful for this type of detail work.
Fiberglass Mesh
Whitney laid up her mosaic on fiberglass mesh so that she could work at her table instead of squatting in the bathtub to individually attach each shell. A PVA adhesive such as the Weldbond we sell is best for attaching tile and found objects to mesh. To attach mesh-mounted sheets to the wall, spread mortar using a 3/16-inch notched trowel and press the sheets into it. After the mortar has hardened over night, the mosaic can then be grouted in the conventional way (if using flat tile).
For a found-object mosaic such as Whitney’s, carefully apply small amounts of mortar between the found objects using a palette knife or grouting bag (instead of rubbing grout across the mosaic indiscriminately). This type of detailed concrete work is a labor of love and takes some time, but it is actually enjoyable because you can see the finished product emerging as you work. It is like putting the finishing strokes on a painting.
Leave a Reply