Avoid Studio Obsession
Setting up and organizing your studio or corner workspace can become an end unto itself and just one more thing that keeps you from working on your art. Keep in mind that great works of art have been created under terrible working conditions and with minimal tools and equipment. The most important thing you can do for your studio is to make sure you work on your art often and frequently. Incremental improvements will be made over time on an as-needed basis as you notice problems with inadequate lighting, incorrect work surface heights and the other general principles of laying out an art studio.
For many years, my art was made on the floor of whatever small apartment I was living in at the time. My workspace was cramped, and often the project had to be cleaned up and put away immediately after each work session to make room for day-to-day activities like laundry or simply to be able to walk through the tiny room.
In the example below, I show rolling tables, rolling shelves and other moveable fixtures that can be rearranged to accommodate large sculptural mosaics. This is not how my home art space was set up to make mosaics back in the day, and this probably isn’t how you should set up yours (unless you live in a large warehouse with concrete floors.)
Use What You Have (And What Can Be Gotten For Little Cost)
Instead of custom-built low tables on wheels, you can use what I once did: a plastic recycling tote turned upside down and slid into position as needed. Old coffee tables and end tables from garage sales are also useful. Keep in mind that in addition to your main work surface, it really helps to have one or two auxiliary tables on the side. This arrangement of tables creates a highly efficient C-shaped manufacturing cell where the operator can reach a wide range of materials merely by pivoting.
Depending on how many different colors or materials you are working with, you may find that one of your two side tables should be an open shelf instead. An old bookshelf made for small paperbacks is an effective and cheap solution as are shelves mounted on a wall if your workspace is in a corner.
If at all possible, have your main work table set against a window so that you can have natural light and look up from time to time to rest your eyes from the intense up-close work
A C-Shaped Manufacturing Cell
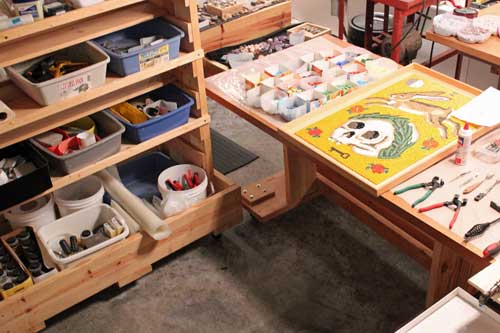
In the picture above, notice the main work surface is augmented by an open shelf to the right and a smaller lower table to the right (almost out of camera view). Notice how the small plastic containers of tile could not be reached by a seated artist. If the artist were seated, those containers of tile would be better places by arranging them on the shelf, preferably a more efficient shelf with more levels than the one shown here. The point of the C-shaped manufacturing cell is to arrange things where the artist can reach them without getting up or stretching.
Use A Low Table For Seated Artists
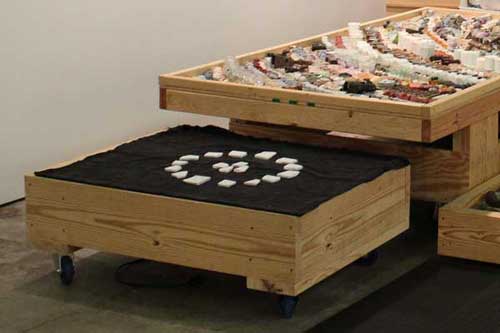
Mosaic is different from painting in that it is best done while the surface is lying horizontally, and this presents a problem in how step back and see the work as a whole as you are working on it. Sure, you can clean off the tools and loose pieces of tile and prop the mosaic up vertically, but this just isn’t practical.
More importantly, it’s difficult to judge how far you are spacing each tile you place if you are looking at the mosaic from a low angle. You need to be looking at it from above. Conventional desks and worktables don’t allow this because they are too high unless you are standing, and that doesn’t make sense for hours at a time. The solution is to use a work surface much lower than what you would use for most other art activities. Old coffee tables are just about the right height and make near ideal mosaic work surfaces, particularly the square ones.
Can You Tell This Picture Has Been Staged?
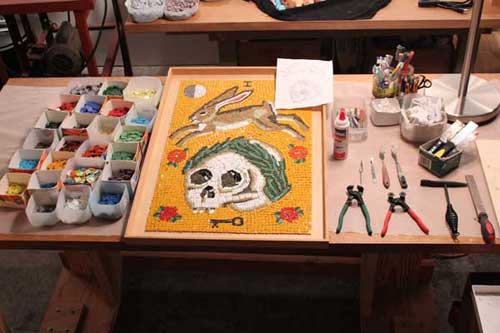
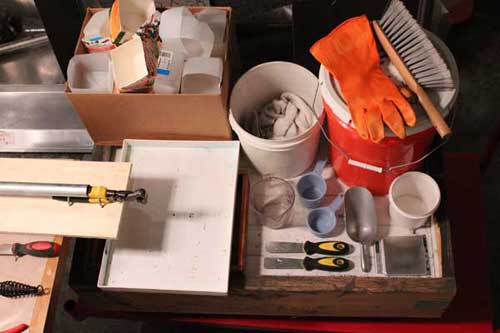
Once you work on a mosaic, the above picture should make you chuckle with its artificial neatness. I’ve laid out all the nippers, palette knives, tweezers, etc. like surgical instruments. Keep in mind that surgeons have interns and nurses and even other surgeons to assist. That means you have to keep things findable yourself.
That doesn’t mean rows, but it does mean rough zones that radiate out from your current site of active work. The zone can be as simple as tools right, blues top, greens left.
How To Manage Your Immediate Work Area
The place on the mosaic where you are actively mounting tile tends to get ringed with the tools you are currently using (glue, rag, tweezer, pick) and bins of the different colors most relevant to that location. Try to keep the stuff you aren’t using most swapped toward the back of its zone.
Also if you’re like me, you will want to create a special zone where you periodically slam down something you’ve had to search for a minute or two to find. If it keeps getting lost, put it in the special zone.
Why You Can Only Be So Disorganized
You will find yourself reaching for a palette knife as quick as any surgeon reaching for a scapple when you need to do stuff like scoop runny wet mortar before it drips onto an unsealed 250 myo limestone ammonite fossil to stain it forever. You have to work carefully and deliberately and quickly when you fabricate a surface from artifacts, and you have to know what to do when things go wrong.
And things do go wrong when you work with wet concrete and stuff easily stained by concrete.
You can be in a good rhythm, but then you will drop something, and before you know it, you will suddenly have concrete on both hands, plus the past 6 things you touched, including whatever you are currently holding, which will continue to get dirtier until you just drop it and accidentally touch you hand to your face or hair in frustration. And then you laugh like a crazy man or cuss or both and spend the next five to ten minutes bathing things and picking concrete out of your eyebrow.
Contain Your Cutting Slivers
You can’t just cut tile, especially glass tile without creating some dangerous slivers and splinters, so this means you can’t indiscriminately hold your cutting tool over your lap or work surface. Cut tile over a tray or plastic tote to help contain the slivers generated by cutting. Totes with some depth like dishpans and unused litter boxes are more effective than flat trays for catching splinters that shoot out instead of merely falling.
Why is this important? Random slivers lying invisible on surfaces cause more cuts than handling the tile. Inevitably you touch your finger, hand or forearm to the surface, and you have cut yourself before you know what is happening. The cuts are usually surprisingly deep given the size of the slivers. I’ve had one roll a deep cut all the way across my palm when I foolishly brushed a seemingly clean table with my bare ungloved hand.
Keep your shop vacuum in the cell of the workstation if possible and use if frequently with a counter brush like the kind we sell.
I have a wire mesh fitting over my vacuum hose, and it makes the vacuum a lot more useful. I use the wire mesh fitting for vacuuming the dust out of all my small part containers without having to remove the parts: mosaic tile, screws, hardware, fossils, teeth, arrowheads, artifacts. This is huge when you have a room with thousands of open-top containers of small parts.
How To Make A Mesh Vacuum Fitting
I made the mesh fitting from 3/8″ hardware cloth (galvanized steel wire mesh) folded over the end of a hose pipe salvaged from a dead shop vac. The wire mesh was folded under at the outer edges, and I spent a few minutes with with the needle nose pliers nipping and tucking under the sharp ends. Then I wrapped it about three times with duct tape.
What Your Really Need To Know About Duct Tape
Just because you are using duct tape doesn’t mean that your work has to be “halfast” and disposable. You can form up some useful things with duct tape. Also, the environmental cost of making duct tape and disposing it when worn out means that it is actually a very expensive material and should not be used carelessly.
The nozzle I made was wrapped about three times with duct tape. If you leave the sharps turned out, you could wrap a whole roll on there and still get poked if you ever pressed down on it good.
Tools List
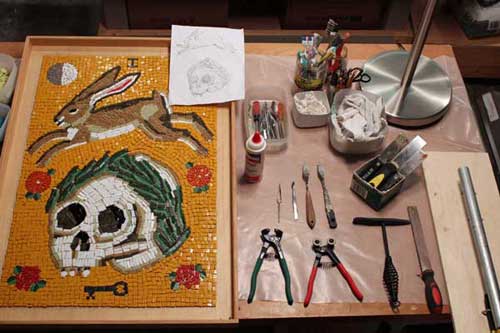
In the tools laid out above, some are more clearly visible than others, so my list begins with the less than obvious and the less visible:
- misting water bottle (not shown)
- glue tray for dipping tiles in glue -use plastic lid (not shown)
- tray of cotton swabs
- tray of assorted metal detail tools: dental picks, tweezers of different type, small pocket screwdrivers, palette knives, butter knives, spoons
- palette knives
- putty knives
- pencil cup full of odd tools: scissors, toothbrushes, pencils, markers, box cutter
- marble file
- mosaic glass cutter
- tile nipper
Grout Mixing Tools
I don’t mix my grout or thinset mortar up in the workstation where I actually position the tile. I prefer to mix up and wash up in a separate place, preferably where things can be hosed down without the possibility of getting concrete in any drains. For this reason, your grout and grout mixing supplies don’t have to be stored around your mosaic workstation.

Leave a Reply