Rectangular backers are fine for most mosaic designs, but sometimes you want to make an irregularly-shaped mosaic or a mosaic with a custom shape, such as the silhouette of a common object: tree, automobile, flower, turtle, etc. How you make such a backer and what materials you use depends on whether or not the mosaic will be installed in an outdoor or wet location. Note that not every location in a kitchen or bathroom has to be considered as being “wet.”
First, I will discuss irregularly-shaped backers, and then I will explain how to make custom-shaped backers for both indoors and outdoors. The last section about custom-shaped backers for outdoors should be useful for people making mosaic signs and placards.
Why You Should Not Buy A Shaped Backer
If you buy a shaped backer from a craft supplier, then your mosaic will have exactly the same shape and size as all the other mosaics made from that particular backer. Also, most of that craft crapola is designed in China, and it all looks rather dated. The saddest customer picture we ever received was a picture of a beautiful mosaic design (serious, intense, original) executed on the most boring, cutesy, cliche shape of a ladybug. Oh what might have been…
Irregularly-Shaped Backers
If you want more of a random “found” shape instead of a specific shape, then the solution is to use a piece of scrap plywood or flagstone depending on whether or not the mosaic is outdoors.
Indoors
For indoor mosaics, you can use a piece of 1/2″ cabinet-grade plywood, and a local carpenter or cabinet maker can give you more than you could ever use. Check with friends and their spouses for a few pieces of scrap, or you can buy a sheet of cabinet-grade plywood at a building material store such as Home Depot or Lowes and have a friend cut out what you need with a jigsaw. You can also buy a decent jigsaw for about $75, but make sure you follow the safety instructions and maybe watch a safety video or two on Youtube if you are a novice with power tools.
Outdoors
For outdoor mosaics, you should not use wood or adhesive. Wood doesn’t even have to get wet for the humidity in the air to swell and warp it. Instead of the glue-then-grout method used for indoor mosaics, you should use thinset mortar to attach the tiles to a stone or masonry surface. Concrete backer board can be used for rectangular and circular mosaics that have some sort of frame (such as the rim of a metal patio table), but the edges of concrete backer board can be crumbly, and that makes it a lot less useful for irregularly-shaped mosaics where the edges are left unfinished, such as you see in the fragments of ancient Roman mosaics displayed in museums.
To make an irregularly-shaped outdoor mosaic in the style of a Roman or Greek fragment, use a piece of flat flagstone such as can be found at stone stores, landscaping stores and some higher-end lawn and garden centers. Avoid slate and sandstone, especially the softer varieties. You can get a general idea of how soft or brittle a type of stone is merely by paying attention to how it has been breaking or scratching or weathering in the big piles or stacks at the stone store. Slate is good and flat and smooth, but it tends to be thin and break too easily for most sane people to care about mosaicing on it.
Custom-Shaped Backers For Indoor Mosaics
For indoor mosaics, 1/2-inch cabinet-grade plywood is my preferred backer, and it is sold at most building material stores. It comes pre-sanded and is more resistant to warping than the cheaper plywood used for construction sheathing. There also fewer if any internal voids in the plies of wood, so the edges are stronger and look neater. The few extra dollars for cabinet-grade plywood are worth the cost.
The shape of your backer can be drawn directly on the plywood with a pencil, or you can first draw the shape on cardboard or paper and then cut it out and use it as a stencil and trace the shape on the plywood.
Cutting the shape out is best done with a jigsaw, which can be bought for about $75, but you can ask friends and their spouses to do it for you if they have one. Most people who work with carpentry or cabinetry will have one, but if you decide to cut it yourself, make sure you watch an online safety video about using jigsaws first. In my opinion, jigsaws aren’t nearly as dangerous as circular saws and table saws, but novices should be extra careful when using power tools.
Custom-Shaped Backers For Outdoor Mosaics
Metal isn’t recommended as a mosaic backer, but if you are mounting the mosaic outside, then metal will probably be involved in some way, at least in how the mosaic is attached to the building or post. The most obvious solution is to have concrete backer board set in a metal frame made from angle iron, and this frame can have mounting studs (bolts) welded to it prior to painting it and inserting the backer board.
I don’t recommend hanging mosaic signs from chains because mosaic work is heavy, and intense wind from storms can turn the sign into a battering ram. Also, the chains would need to be checked periodically for wear, and the artist cannot guarantee that the owner of the sign will do this over time.
Of course, a frame made from angle iron is really only practical for rectangular shapes.
My approach for making a custom-shaped mosaic for outdoors was to put the steel inside the concrete. Essentially, all I did was cut out my shape in 3/4″ expanded steel using a cardboard pattern as template, then weld mounting studs (bolts) to it, and then I encased it in thinset mortar, which is a type of sticky concrete.
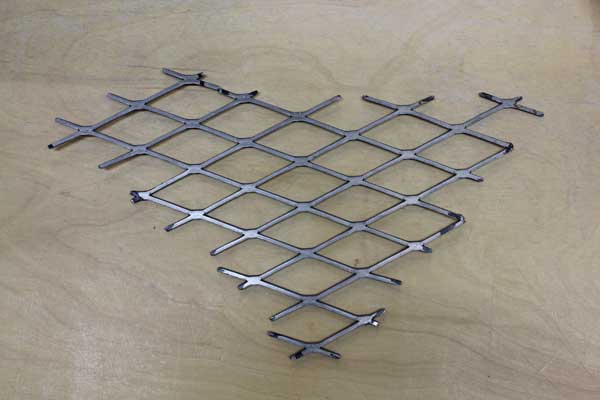
The 3/4″ expanded steel was cut using an angle grinder with a thin cutting wheel because I didn’t have a cutting torch and haven’t yet saved up enough money to buy a plasma cutter. (Are you listening Santa?)
I used my cardboard template to outline two pieces of expanded steel, and I made sure that the direction of the expanded metal was oriented at 90 degrees between the two pieces. That way when I welded them together, I was sure that the holes would not line up perfectly. Instead, I wanted the holes in each piece of metal to be partially covered by the other sheet.
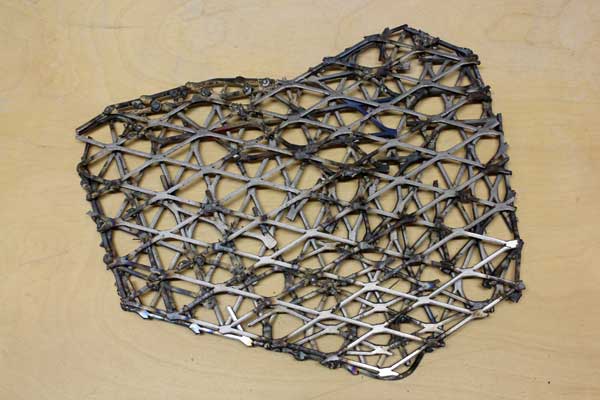
Once I had my shape welded together, I welded some 3/8-inch bolts to it to that the finished mosaic could be bolted to a wall. Then the frame was scoured with the stiff wire brushes that are used to clean welds.
The thinset mortar I used to cover the frame was applied in multiple coats. The first coat was mixed with about 50% fine pea gravel so that the mortar had some bulk to fill the holes in the frame. Note that most pea gravel you see at lawn and garden centers will need to be sieved through 1/4″ hardware cloth or at least have the larger stones picked out. If that seems tedious, then consider how tedious it will be to pick put the large stones once they are coated in sticky concrete but are too big to be pressed into the frame. (Been there.)
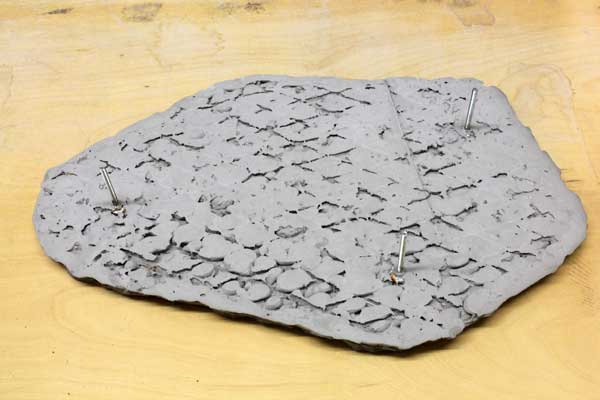
Thinset mortar contracts or “thins” as it cures, so there isn’t much point in making your surface perfectly smooth with the first application. Of course you want it level, and you don’t want any large pieces sticking up, but there is no need to try to smooth it to a finished surface with a trowel. If you do smooth it perfectly, you will notice dimples that get larger each day for about a week as the thinset contracts internally.
Due to this internal contraction and the resulting dimples, I wait about a week before applying this second coat, which mainly involves spreading the thinset on the face with a putty knife or trowel and then turning the mosaic face down on a piece of construction plastic.
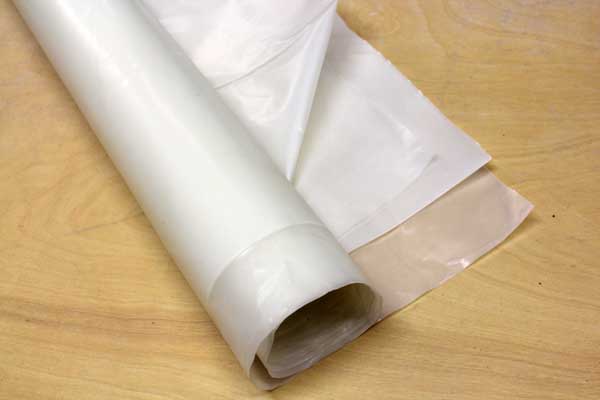
Construction plastic is sold in large rolls at building material stores. A cheaper alternative is clingy kitchen wrap such as the Saran Wrap brand. Kitchen wraps aren’t as strong, and they don’t tend to stay put even when taped down, but an easy solution to this problem is to find a large piece of cardboard and wrap it around the cardboard about 3+ layers deep. Then you can lay the covered cardboard on your work surface.
WARNING AND DISCLAIMER
Use this improvised method and these instructions at your own risk. Like all the instructions on my websites, these instructions haven’t been rigorously tested in corporate laboratories. Neither can they anticipate all the potential mistakes an individual could make in executing them. As always, if you are installing anything for a client, it is your obligation to evaluate the strength, safety and longevity of your art, especially if it is to be displayed in a public space.
All that being said, there isn’t too much if anything in these methods that uses materials in a way that they aren’t commonly used or at least in a similar way. Unless you weld things in an amateurish way or fail to clean the welds, then the backer should have a very long life, even outdoors. The only mode of failure I am particularly concerned about is the possibility of the bolts rusting through over time, although that would be a concern with any heavy sign mounted by bolts.
Leave a Reply