There are two options for bases for making a mosaic sculpture for your lawn:
- Buy an unfinished concrete sculpture from a lawn and garden center or a store that specializes in concrete lawn sculpture.
- Make your own concrete sculpture using cement and chicken wire and pea gravel and similar reinforcing materials as discussed on various websites found by searching Google for “concrete sculpture” or our page for how to make concrete mosaic sculptures.
Note that my page focuses on a large structural base I was making at the time while some of the other websites have better pictures of how to crumple up chicken wire to make smaller figurines. However, the Internet contains a lot of problematic advice about hypertufa and other practices, so make sure you read my caveats below.
Each of these options has advantages and pitfalls that are important to consider before deciding which route you will go. Either way, following best practices to prevent moisture penetration is critical for ensuring the longevity of your mosaic lawn art.
Purchasing A Factory-Made Base
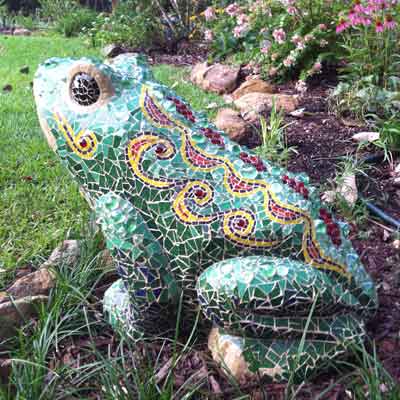
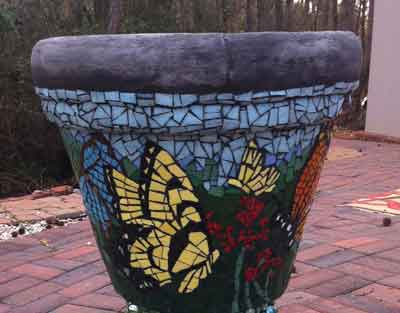
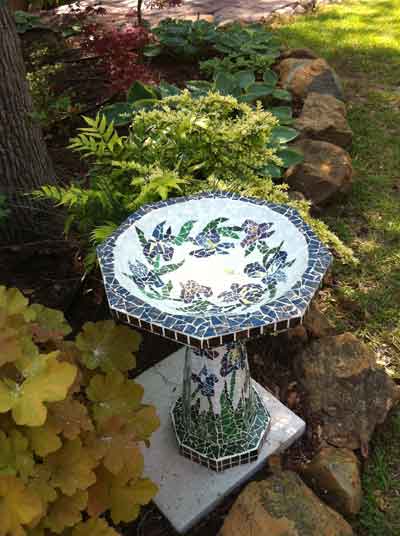
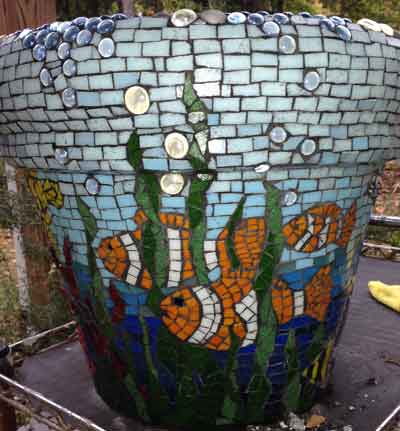
A factory-made base purchased from a lawn and garden center will be identical to all the other pieces made from the same mold, but there is obvious the advantage that you can start mosaicing immediately without having to make the base yourself, which is a complete project in itself and tends to be more labor intensive than expected, unless the artist has worked with concrete before. Also, you can make the generic base into an original work of art by how you tile it, as demonstrated by the artwork by Lyn Richards featured on this page.
Sealants Can Interfere With Bonding
If a drop of water soaks into the surface of the concrete, there is no excess sealant present, and the thinset mortar used to attach tiles should be able to bond securely.
Sometimes you can find factory-made sculptures that have been drenched in sealants, and these can interfere with thinset’s ability to bond to the concrete securely, and tiles could fall off over time. If a drop of water beads on the surface of the sculpture (similar to how water beads on a waxed car), then you know the sculpture is coated in a sealant that should be removed before mosaicing. To remove the sealant, scour the surface with a stiff wire brush of the type used to clean welds (the wires are stiffer and more coarse than those on most wire brushes used to clean barbeque grills).
Beware Of Lightweight Concrete
Sometimes factories will mix expanded perlite or other materials into the concrete to make it weigh less than regular concrete. This is fine in theory, but the expanded perlite is highly porous and mostly air and therefore readily absorbs water. This makes the sculpture highly vulnerable to freeze damage: water seeps in, freezes and expands, and then the surface of the concrete flakes off. If you find a sculpture that appears to be lighter than expected or has a softer or more porous look to it, then coat it all over (bottom included) with a layer of thinset mortar and allow that to harden before you mosaic on it.
Making Your Own Concrete Sculpture For A Base
Mixing up even 5 pounds of concrete can be labor intensive, and mosaic lawn sculptures of any size at all can require 25 to 50 pounds at least. As you might recall from mixing up grout, your arms feel it even with the small batches, and most people will find a drill with mixing paddle necessary to mix up anything over 10 pounds.
Several of the websites explaining how to make concrete sculpture emphasize the need to make the bases hollow or to use Styrofoam or harder varieties of expanded polystyrene to fill internal voids. This is good sound advice, especially if you make the surrounding shell of concrete structurally sound by reinforcing it with metal rods and wire.
Thinset Instead Of Regular Concrete
There are different concrete mixtures recommended on the various websites, some of which include glass fibers used to give the concrete the tensile strength it normally lacks. For my concrete sculptures, I used thinset mortar instead of regular concrete. Thinset mortar is like regular cement with sand, but it also has polymers for adhesion and tensile strength. I also mixed in fine pea gravel for additional strength and bulk. The pea gravel was sieved to remove larger pieces and added 1 part pea gravel to 2 parts thinset on a weight basis.
Thinset is more expensive than regular concrete, but it is so much stronger, and you don’t have to worry about whether or not it is adhering well to a bare wire frame. Also, if you have to add concrete to a large frame in multiple batches mixed in multiple studio sessions, you can be confident that the fresh thinset is adhering to the thinset that is already hard, and you can’t say that about regular concrete, which is likely to form a crack at the boundary.
Of course, the concrete sculpture recipes I saw on various websites recommended different latex additives that should be added to the regular concrete to make it be more like thinset. But my thoughts were why reinvent thinset from different components if I could simply buy thinset, which was actually cheaper by the time you factor in the additives. Also, instead of picking or sieving the larger rocks from a bag of concrete, I thought it made more sense to start with a bag of thinset (which contains no stones) and add the exact size of pea gravel I needed to ensure it fit into my wire mesh frame.
Hypertufa
Hypertufa is synthetic version of a type of porous limestone called tufa, and it is popular for making custom planters because its porosity is good for plant roots and getting covered with moss and lichens. Hypertufa is made by mixing peat moss and perlite and sometimes other materials into concrete to make it porous and lightweight.
About half the post you see on gardening blogs repeat the mantra the hypertufa is completely freeze proof. The other half are asking for advice of how to prevent their hypertufa planters from mysteriously cracking (usually with an acknowledgment that they accept the official dogma that the cracking couldn’t possibly be due to freezing temperatures).
What I do know is that all other porous materials I have encountered in my experience with outdoor mosaics are highly susceptible to freeze damage: terracotta, unglazed ceramic, unpolished stone, etc. If it has small holes in it, even tiny microscopic holes, then moisture penetrates and freezes and cracks or flakes the surface.
I’m not sure why hypertufa would be any different. The peat moss and perlite are ready conduits for deep moisture penetration. I strongly suspect that hypertufa is so soft that the damage due to freezing and expanding doesn’t result in macro cracks right away, and thus people with weak reasoning skills assume it is freeze proof. Later when cumulative damage finally results in a crack, the crack is attributed to the anger of the hypertufa gods or something like that.
I strongly suspect that hypertufa is so soft that the damage due to freezing and expanding doesn’t result in macro cracks right away, and thus people with weak reasoning skills assume it is freeze proof. Later when cumulative damage finally results in a crack, the crack is attributed to the anger of the hypertufa gods or something like that. “I must have done something wrong in how I mixed up the hypertufa or cured it. It couldn’t be the freezing winter conditions.”
All that being said, hypertufa is fine for someone making a simple un-mosaiced planter and wants it to crumble away slowly like natural limestone. But if you are going to the time and expense of covering it with mosaic tile, then avoid hypertufa. If you want to make a lighter core from concrete mixed with perlite, that is fine, but cover the outside with a layer of thinset before you mosaic to ensure that the vulnerable porous material is protected from the risk of moisture penetration and freeze damage.
How To Mosaic A Concrete Lawn Sculpture
Like all outdoor mosaic and wet mosaic, the tile should be attached with thinset mortar instead of glue. Other than that, the instructions are more or less the same as our instructions for regular flat panel mosaics. I wrote some detailed instructions for using thinset mortar for mosaic art.
You can grout an outdoor mosaic with thinset instead of grout. Thinset is harder and more water-resistant than traditional grout, so it is probably better to use thinset for grouting. Thinset can be dyed with concrete dye. (Note that I am always talking about traditional powered thinset mixed with water and NOT the new epoxy-based systems with a liquid component). I use Versabond thinset in my work, and I have exceeded the dye manufacturer’s maximum recommended amount of dye in the thinset by a factor of 2 without affecting hardness or bond strength in any way that I could notice, but I am sure that it is possible to add too much dye depending on the brand.
Tip: Put cardboard on your work table to protect it from the weight and roughness of the concrete sculpture.
Tip: Rest the bottom of the sculpture on small blocks such as stone tiles or whatever so that you can mosaic and grout the bottom edge of the sculpture without the surface of the table getting in the way.
Tip: Consider sitting your sculpture on some plain concrete stepping stones when you install it in the garden by raising it slightly off the moist soil, you can greatly increase the life of the mosaic, especially the tiles near the bottom edge.
Tip: Use a pencil or marker to draw patterns on the surface of the sculpture.
Tip: Never use one color blue to make a color field when you could mix two similar blue colors to make the same field of color. It makes the element more visually interesting.
REQUIRED: After your grout has hardened for a few days, seal your finished mosaic sculpture with multiple applications of a tile and grout sealer following the instructions on the package. It wipes right off glass tile and only seals invisible pores.
Leave a Reply