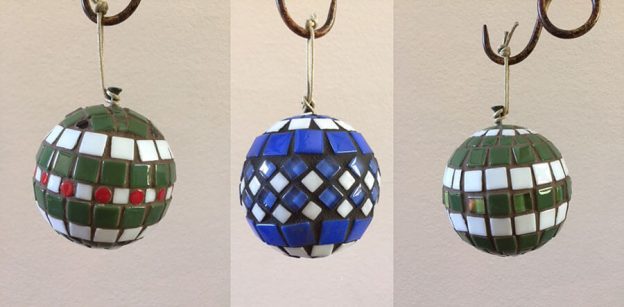
Artist Phyllis Kempter emailed me some photos of the ornaments she made using our kits for 3-inch spherical mosaic Christmas ornaments and our 12mm recycled glass tile (plus a few other sizes of tile), and her ornaments caught my eye for two reasons:
First, she used green in the patterns for her ornaments, which is good to do if you think the ornament might by hung on something other than a Christmas tree, at least some of the time. Green might not help the ornament stand out on the tree as well as red would, but it goes a long way toward suggesting Christmas when the ornament is not on a tree, especially when used with red.
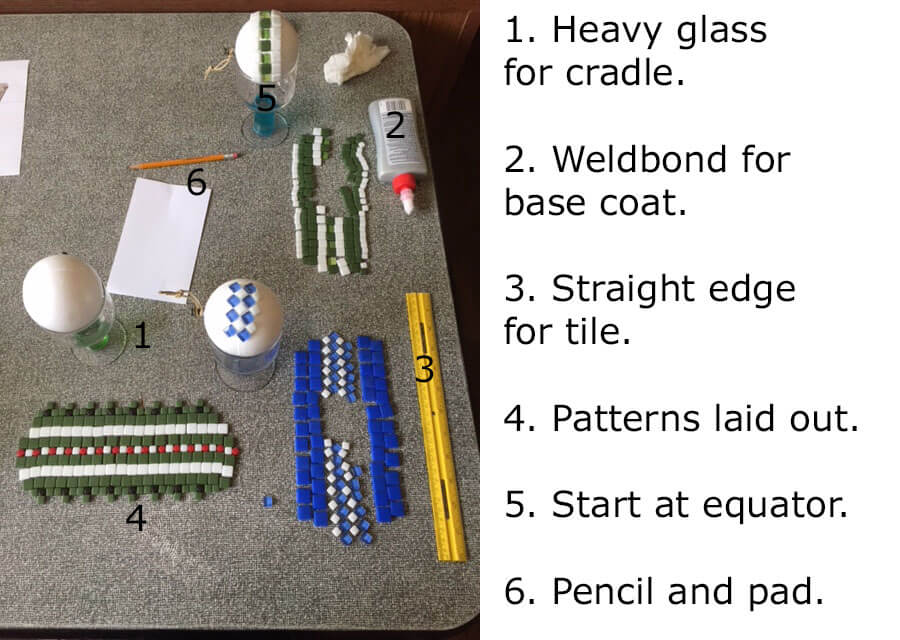
Second, one of her photos was of her well-organized work space, and it illustrates several methods and tips for making the tiling process easier and faster.

Fast and Efficient Tiling
Heavy Glass for Cradle
Phyllis used wine glasses with heavy stems for her cradle, which allowed her to rotate the sphere and always be working on the top surface. A tall glass is ok, provided it has a heavy base to keep it from falling over as the ornament gets heavier. I prefer a ceramic coffee mug.
Weldbond for Base Coat
When you glue tile to the sphere, it will dry faster if the sphere is already covered in a base coat of glue that is already thoroughly dry. To give your sphere a good base coat of Weldbond, simply hang it up and brush on the glue and allow to dry, preferably for 12+ hours.
Straight Edge for Tile
For laying out grid patterns of tile, any straight edge can be used to quickly arrange and space tile, but a ruler is best because you will often need to measure things, especially when laying out repetitive geometric patterns.
Patterns Laid Out
Lay out your patterns in advance of gluing on the tile, just as Phyllis shows in her photo. You will still need to keep your eye on the ornament as you tile and make slight adjustments to maintain uniform-ish grout spacing (instead of trusting the pattern blindly only to discover that the last tile doesn’t quite fit or fits with an awkward final gap).
Start at Equator
Start at the equator and tile one row all the way around. If you get this row straight, all other rows are likely to be straight. Start with any row, and things are likely to be lopsided at the other pole.
12mm
Assuming a standard grout gap of 1/16 inch, it takes 17.5 of the 12mm (1/2-inch) tiles to go around the equator. With no grout gap, it would take 19.9 tiles. The logical thing to do is use 18 tiles and make the grout gap slightly less than 1/16 inch.
8mm
Assuming a standard grout gap of 1/32 inch, it takes 27.2 of the 8mm (5/16-inch) tiles to go around the equator. With no grout gap, it would take 29.9 tiles. The logical thing to do is use 28 tiles and make the grout gap slightly more than 1/32 inch.
Pencil and Pad
Sometimes you have to figure out how many tiles fit in a space of certain width, especially when you deviate from your patterns or things get a little “ad hoc” at one of the poles because you didn’t keep things perfectly straight or evenly spaced.
Which Size Tile?
Which size tile is best for use on our 3-inch mosaic ornament bases?
The 12mm (1/2-inch) size and 10mm (3/8-inch) size are best if you are making a bold repeating pattern. Just look at the photos of Phyllis’s ornaments if you have doubts about that and are thinking of using something larger. Much larger than 12mm, and the tiles are too wide to easily sit flat on the curved surface of the 3-inch sphere.
For making a simple bold figure on the sphere using uncut tile (something like a smiley face or an initial), the 8mm is probably the best size.
For rendering a more detailed image using cut pieces ranging in size, go with the 12mm recycled glass tile.


Leave a Reply